Exercise Description
While it is possible to write a playbook in one file, as we’ve done throughout this workshop, eventually you’ll want to reuse files and start to organize things.
The "role" feature in Ansible is the way we do this. When you create a role, you deconstruct your playbook into parts and those parts sit in a directory structure. "Wha?? You mean that seemingly useless best practice you mentioned in exercise 1.2?" Yep, that one.
For this exercise, you are going to take the playbook you just wrote and refactor it into a role. In addition, you’ll learn to use Ansible Galaxy.
Let’s begin with understanding how your apache-basic-playbook will break down into a role.
Fortunately, you don’t have to create all of these directories and files by hand. That’s where Ansible Galaxy comes in.
Section 1: Using Ansible Galaxy to initialize a new role
Ansible Galaxy is a free site for finding, downloading, and sharing roles. It’s also pretty handy for creating them, which is what we are about to do here.
Step 1:Navigate to your project
Navigate to your apache-basic-playbook project.
cd ~/apache-basic-playbookStep 2: Create a directory
Create a directory called roles and cd into it.
mkdir roles
cd roles
Step 3: Initialize new role
Use the ansible-galaxy command to initialize a new role called apache-simple.
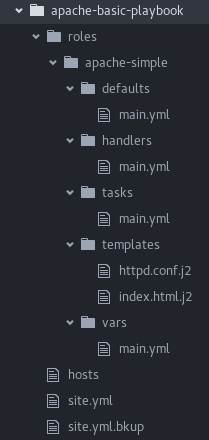
ansible-galaxy init apache-simpleTake a look around the structure you just created. It should look a lot like Figure 1 above. However, we need to complete one more step before moving onto Section 2. It is Ansible best practice to clean out role directories and files you won’t be using. For this role, we won’t be using anything from files, tests.
Step 4: Remove directories
Remove the files and tests directories
cd ~/apache-basic-playbook/roles/apache-simple/
rm -rf files tests
Section 2: Breaking your site.yml playbook into the newly created apache-simple role
In this section, we will separate the major parts of your playbook, including vars:, tasks:, template:, and handlers:.
Step 1: Backup
Make a backup copy of site.yml, then create a new site.yml.
cd ~/apache-basic-playbook
mv site.yml site.yml.bkup
vim site.yml
Step 2: Add play definition/Invoke role
Add the play definition and the invocation of a single role.
---
- hosts: web
  name: This is my role-based playbook
  become: yes

  roles:
    - apache-simple
Step 3: Add default variables
Add some default variables to your role in roles/apache-simple/defaults/main.yml.
---
# defaults file for apache-simple
apache_test_message: This is a test message
apache_max_keep_alive_requests: 115
Step 4: Add variables
Add some role-specific variables to your role in roles/apache-simple/vars/main.yml.
---
# vars file for apache-simple
httpd_packages:
  - httpd
- mod_wsgi|
Hey, wait just a minute…did you just have us put variables in two separate places? Yes…yes we did. Variables can live in quite a few places. Just to name a few:
Bottom line, you need to read up on variable precedence to understand both where to define variables and which locations take precedence. In this exercise, we are using role defaults to define a couple of variables and these are the most malleable. After that, we defined some variables in |
Step 5: Create role handler
Create your role handler in roles/apache-simple/handlers/main.yml.
---
# handlers file for apache-simple
- name: restart apache service
  service:
    name: httpd
    state: restarted
    enabled: yes
Step 6: Add role tasks
Add tasks to your role in roles/apache-simple/tasks/main.yml.
---
# tasks file for apache-simple
- name: install httpd packages
  package:
    name: "{{ item }}"
    state: present
  with_items: "{{ httpd_packages }}"
  notify: restart apache service

- name: create site-enabled directory
  file:
    name: /etc/httpd/conf/sites-enabled
    state: directory

- name: copy httpd.conf
  template:
    src: templates/httpd.conf.j2
    dest: /etc/httpd/conf/httpd.conf
  notify: restart apache service

- name: copy index.html
  template:
    src: templates/index.html.j2
    dest: /var/www/html/index.html

- name: start httpd
  service:
    name: httpd
    state: started
    enabled: yes
Step 7: Download templates
Download a couple of templates into roles/apache-simple/templates/. And then, let’s clean up the templates from exercise 2.1, by removing the old templates directory.
mkdir -p ~/apache-basic-playbook/roles/apache-simple/templates/
cd ~/apache-basic-playbook/roles/apache-simple/templates/
curl -O http://ansible-workshop.redhatgov.io/workshop-files/httpd.conf.j2
curl -O http://ansible-workshop.redhatgov.io/workshop-files/index.html.j2
rm -rf ~/apache-basic-playbook/templates/
Section 3: Running your new role-based playbook
Now that you’ve successfully separated your original playbook into a role, let’s run it and see how it works.
Step 1: Run the playbook
cd ~/apache-basic-playbook
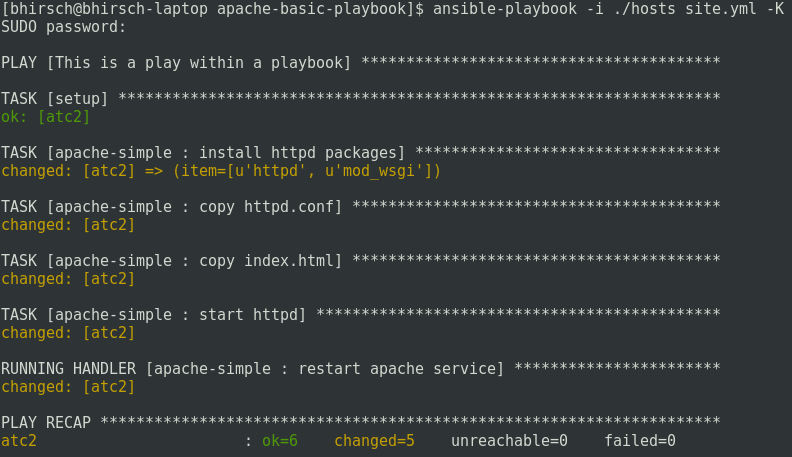
ansible-playbook -i ../hosts site.yml --private-key=~/.ssh/example-towerStep 2: Verify your output
If successful, your standard output should look similar to the figure below.
Section 4: Review
You should now have a completed playbook, site.yml - with a single role called apache-simple. The advantage of structuring your playbook into roles is that you can now add new roles to the playbook using Ansible Galaxy or simply writing your own. In addition, roles simplify changes to variables, tasks, templates, etc.