Stage 1
Estimated time to complete: 20 mintues
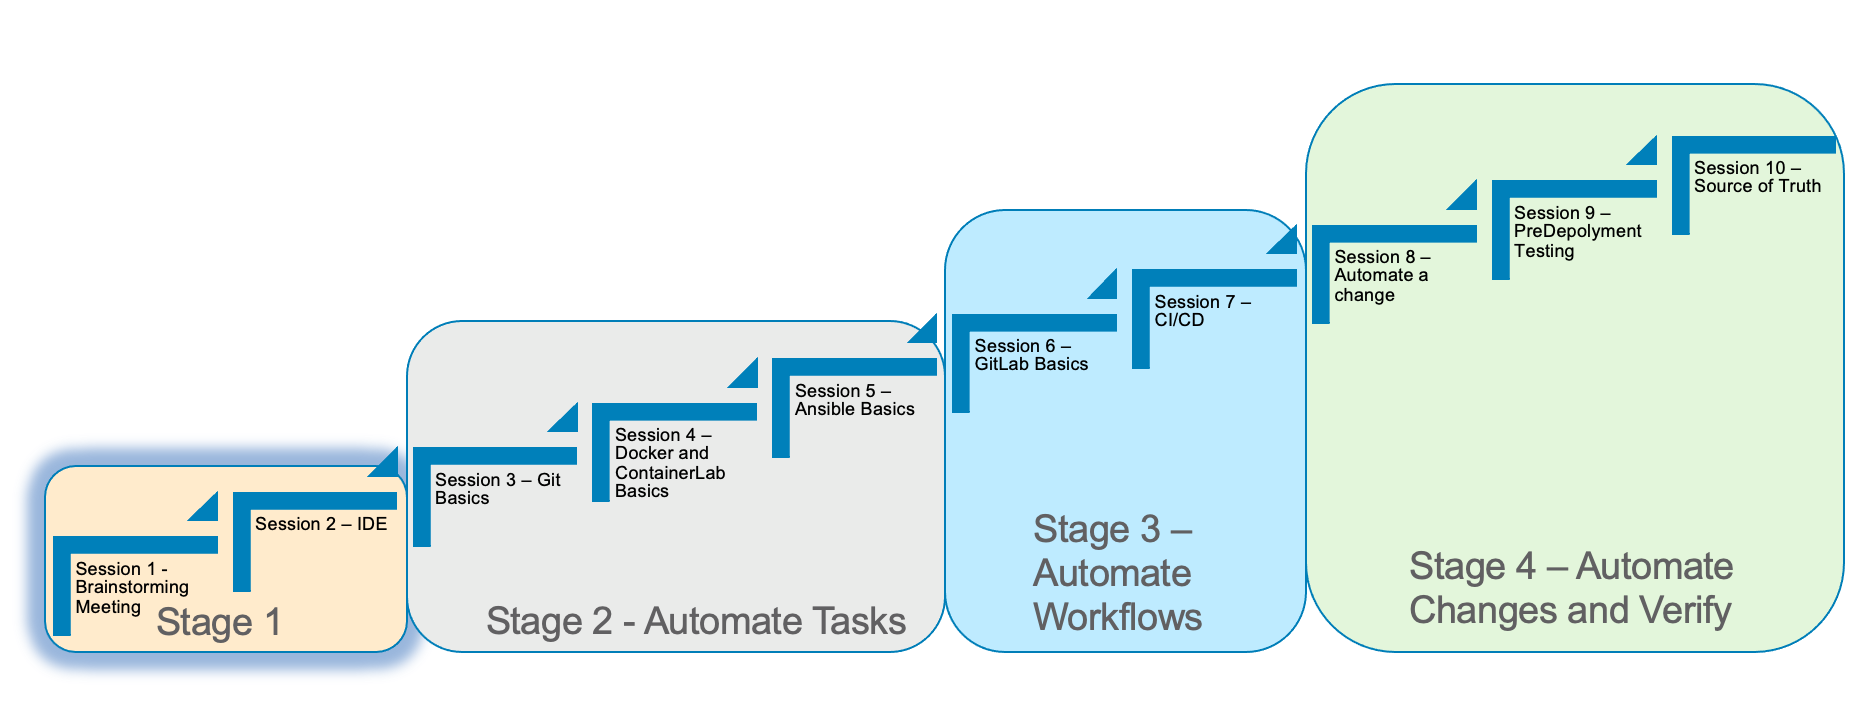
In Stage 1, we will brainstorm ideas on how we can introduce network automation into your environment. We will discuss use cases and tasks that are manually done today that could be automated.
The second part of Stage 1 is to install and initially build the two servers.
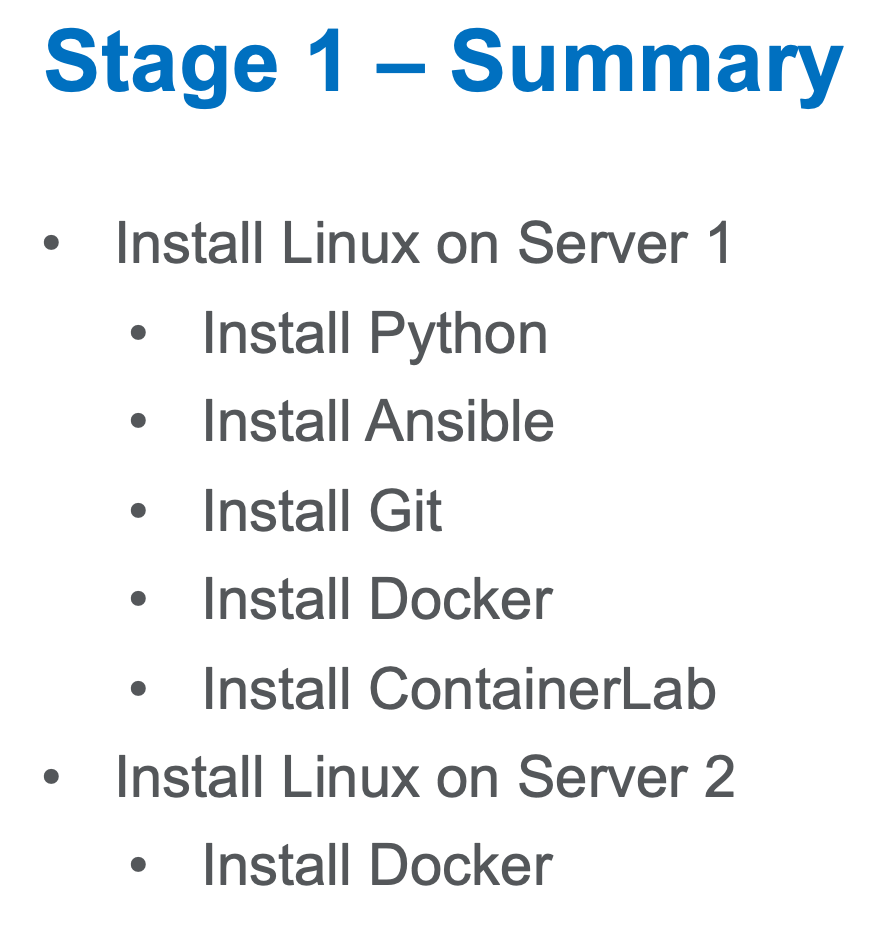
Here is a summary of Stage 1
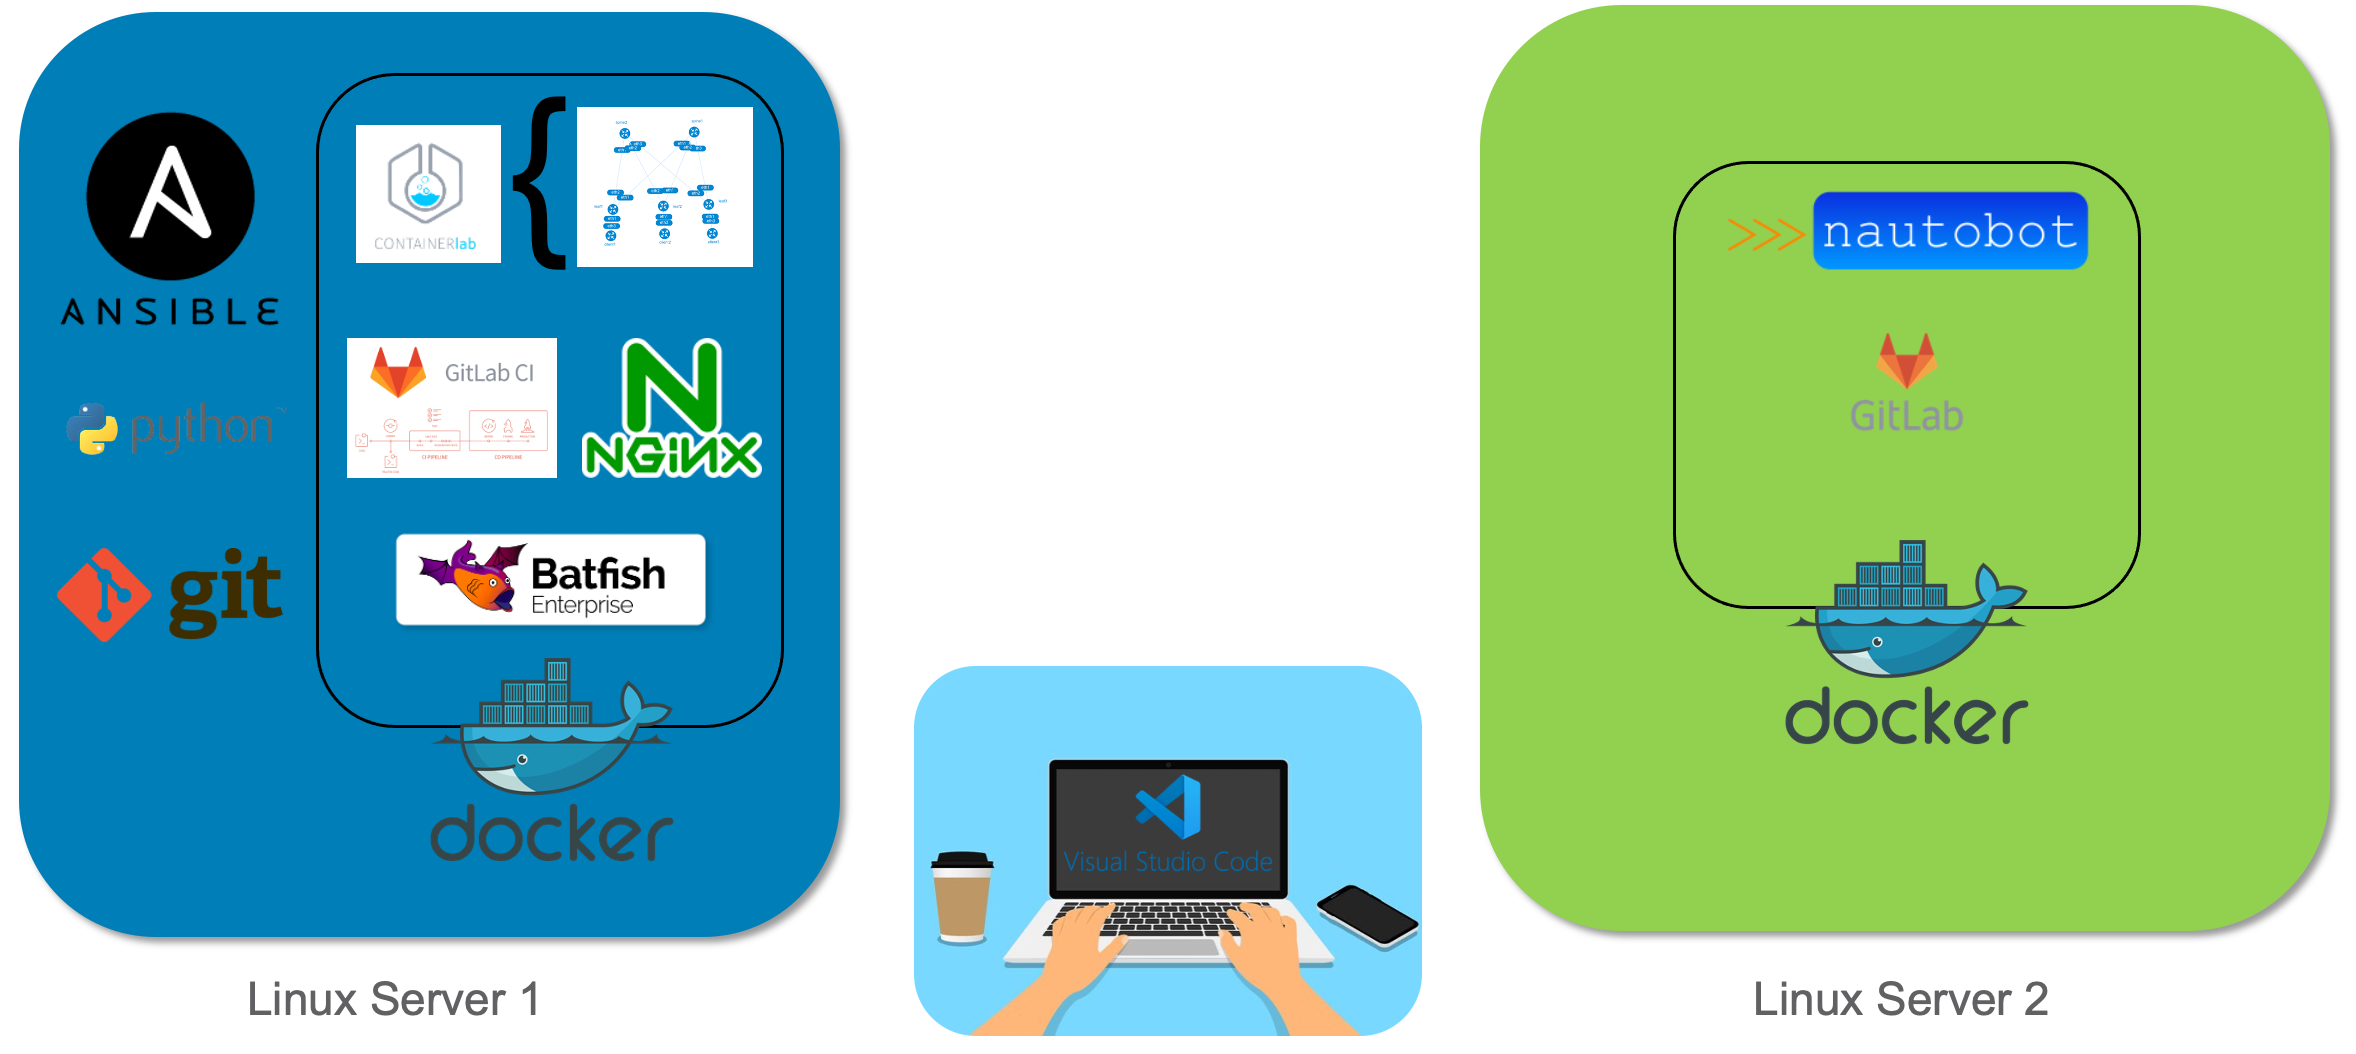
Server 1 and Server 2 Diagram
Server 1 Requirements
-
Ubuntu version 20.04 LTS with the latest updates
-
CPU = 4 vCPU or greater
-
Memory = 8 Gig or greater
-
Disk size = 100 Gig or greater
-
Name = netdev-01
-
Domain = yourdomain.com
-
Register the server in DNS or update the host file
-
Login as a user
Git - Installation on Server 1
Check git version
git versionPerform a quick update on your instance:
sudo apt-get update -yInstall git-lfs on your Server for large file transfers
sudo apt-get install git-lfs -yInstall git on your Server if it is not installed
sudo apt-get install git -yVirtual Environment and Python - Installation on Server 1
Check if Python3 is already installed
python3 --versionPython 3.8 and higher will work
Upgrade Python if it is installed
sudo apt --only-upgrade install python3If Python is not installed
sudo apt update && sudo apt upgrade –y
sudo apt install python3
Install PIP
sudo apt install python3-pip -yVirtual environment installation
sudo apt install python3-venv -yAnsible - Installation on Server 1
Installation of Ansible
sudo apt -y install software-properties-commonsudo apt-add-repository ppa:ansible/ansibleHit Enter to continue
sudo apt-get install ansible -yInstallation of Ansible-pylibssh
pip install ansible-pylibsshDocker - Installation on Server 1
Download Docker
sudo apt-get update
sudo apt-get install ca-certificates curl gnupg -y
sudo install -m 0755 -d /etc/apt/keyrings
sudo curl -fsSL https://download.docker.com/linux/ubuntu/gpg | sudo gpg --dearmor -o /etc/apt/keyrings/docker.gpg
sudo chmod a+r /etc/apt/keyrings/docker.gpg
echo \
"deb [arch="$(dpkg --print-architecture)" signed-by=/etc/apt/keyrings/docker.gpg] https://download.docker.com/linux/ubuntu \
"$(. /etc/os-release && echo "$VERSION_CODENAME")" stable" | \
sudo tee /etc/apt/sources.list.d/docker.list > /dev/nullsudo apt-get updateInstall Docker Engine
sudo apt-get install docker-ce docker-ce-cli containerd.io docker-buildx-plugin docker-compose-plugin -yCheck docker service
systemctl status dockerType q to quit if needed
Add User to Group
sudo usermod -a -G docker $USERLogout and log back in
Check Docker
docker psIf successful, you should see the following:
cloud_user@ed26757f4b1c:~$ docker ps
CONTAINER ID   IMAGE     COMMAND   CREATED   STATUS    PORTS     NAMES
Install Docker Compose
sudo apt-get install docker-compose -yCheck Docker Compose
docker-compose versionContainerLabs – Installation on Server 1
Download and install the latest release (may require sudo)
bash -c "$(curl -sL https://get.containerlab.dev)"Optional Samba Installation
Install Samba
sudo apt install samba -yEdit the Samba config file to create the file share
sudo nano /etc/samba/smb.confScroll to the bottom of the file and add the following:
[share]
comment = Shared Folder
path = /home/$USER/network-automation
writeable = yes
browseable = yes
public = no
Ctrl + O to save Ctrl + X to exit
Restart Samba Service
sudo service smbd restartSet up your username to access the share
sudo smbpasswd -a $USEREnsure the file share works: \\a.b.c.d\share
| Replace a.b.c.d with the IP address of Server 1 |
Server 2 Requirements
-
Ubuntu version 20.04 LTS with the latest updates
-
CPU = 4 vCPU or greater
-
Memory = 8 Gig or greater
-
Disk size = 100 Gig or greater
-
Name = netdev-02
-
Domain = yourdomain.com
-
Register the server in DNS or update the host file
-
Login as a user
Docker - Installation on Server 2
Download Docker
sudo apt-get updatesudo apt-get install ca-certificates curl gnupg -y
sudo install -m 0755 -d /etc/apt/keyrings
sudo curl -fsSL https://download.docker.com/linux/ubuntu/gpg | sudo gpg --dearmor -o /etc/apt/keyrings/docker.gpg
sudo chmod a+r /etc/apt/keyrings/docker.gpgecho \
"deb [arch="$(dpkg --print-architecture)" signed-by=/etc/apt/keyrings/docker.gpg] https://download.docker.com/linux/ubuntu \
"$(. /etc/os-release && echo "$VERSION_CODENAME")" stable" | \
sudo tee /etc/apt/sources.list.d/docker.list > /dev/nullsudo apt-get updateInstall Docker Engine
sudo apt-get install docker-ce docker-ce-cli containerd.io docker-buildx-plugin docker-compose-plugin -yCheck docker service
systemctl status dockerType q to quit if needed
Add User to Group
sudo usermod -a -G docker $USERLogout and log back in
Check Docker
docker psIf successful, you should see the following:
cloud_user@ed26757f4b1c:~$ docker ps
CONTAINER ID   IMAGE     COMMAND   CREATED   STATUS    PORTS     NAMES
Install Docker Compose
sudo apt-get install docker-compose -yCheck Docker Compose
docker-compose versionSetup a Host file entry on both Server (If required)
Not required for acloudguru servers or any servers that will have a FQDN
The following command below will be unique to you and are only required if you did not enter these into your local DNS Server
Edit /etc/hosts
127.0.0.1 localhost
10.1.1.11 lab-server-1.domain.com (1)
10.1.1.10 lab-server-2.domain.com (2)

# The following lines are desirable for IPv6 capable hosts
::1     ip6-localhost ip6-loopback
fe00::0 ip6-localnet
ff00::0 ip6-mcastprefix
| 1 | Modify to reflect your IP addresses and hostnames for Server 1 |
| 2 | Modify to reflect your IP addresses and hostnames for Server 2 |
| Be sure you can log in to your instances. If you can’t log in start shouting, loudly, and waving your hands! |