Stage 4 Automating A Change
Estimated time to complete: 30 minutes
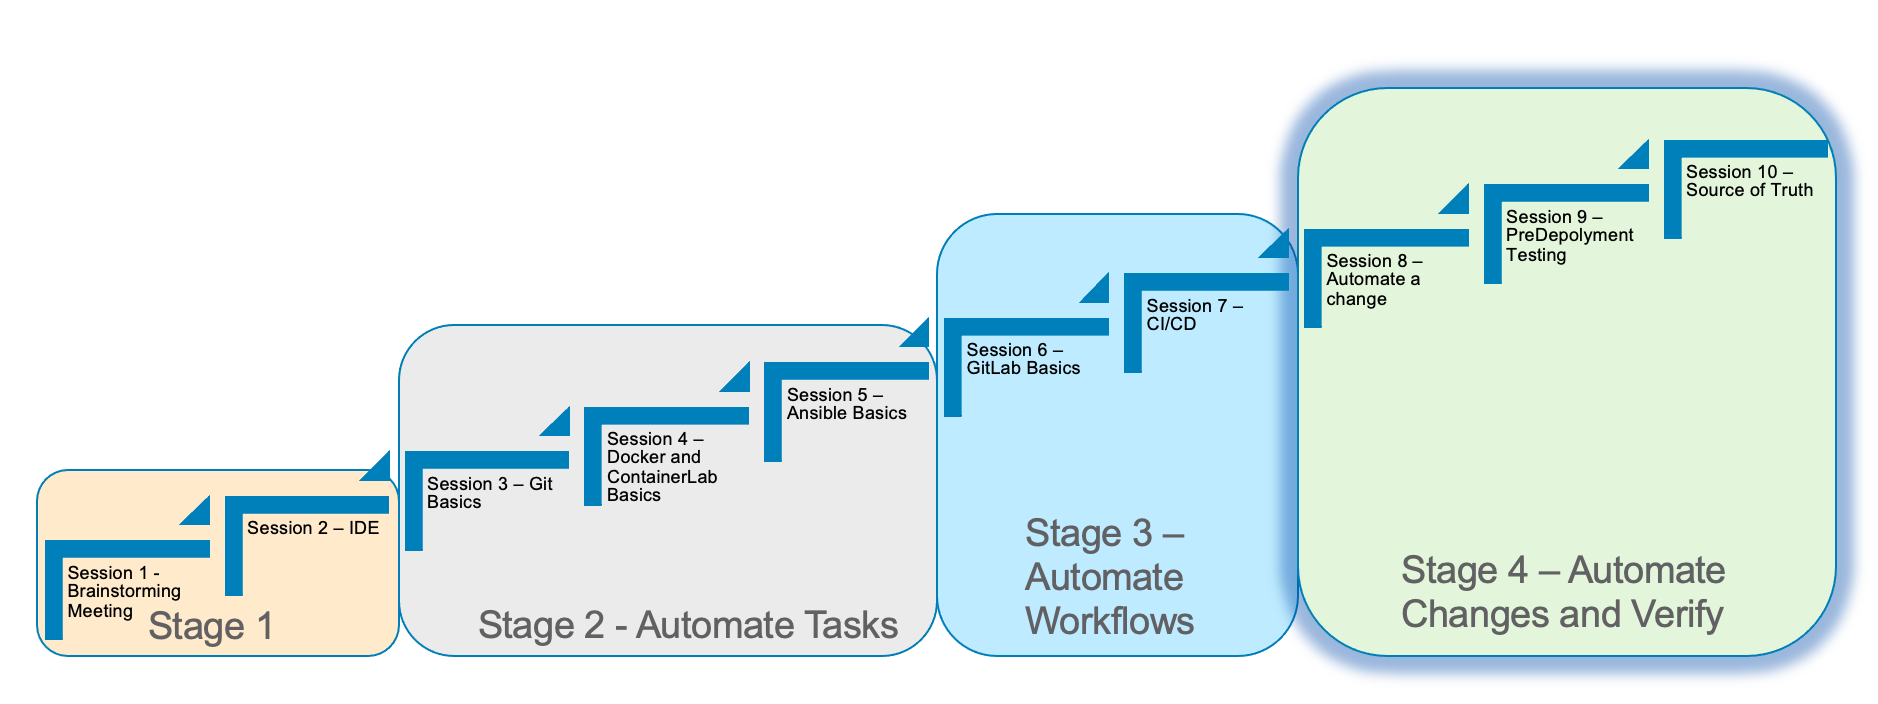
In Stage 4, we will discuss the process of automating a change.
We will run through some of the concepts to understand how to use Gitlab and a CI/CD pipeline to automate a change.
Automating common tasks is one of the advantages to help increase efficency and standardize the network.
Here are the requirements for Stage 4
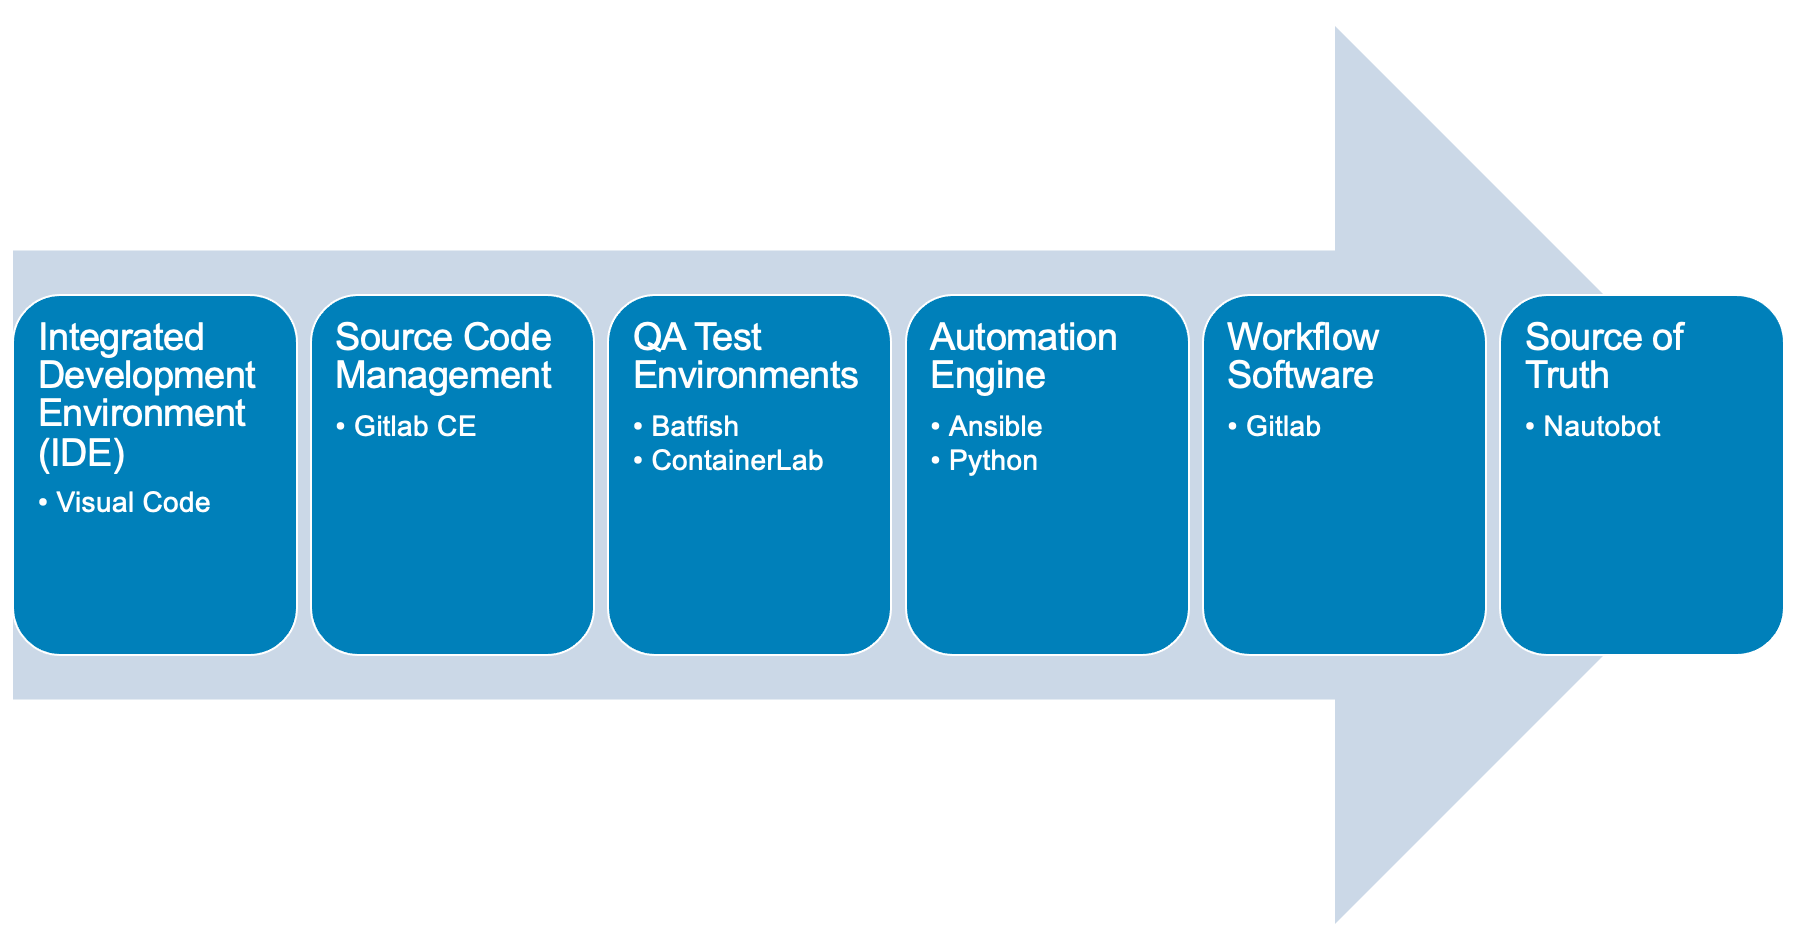
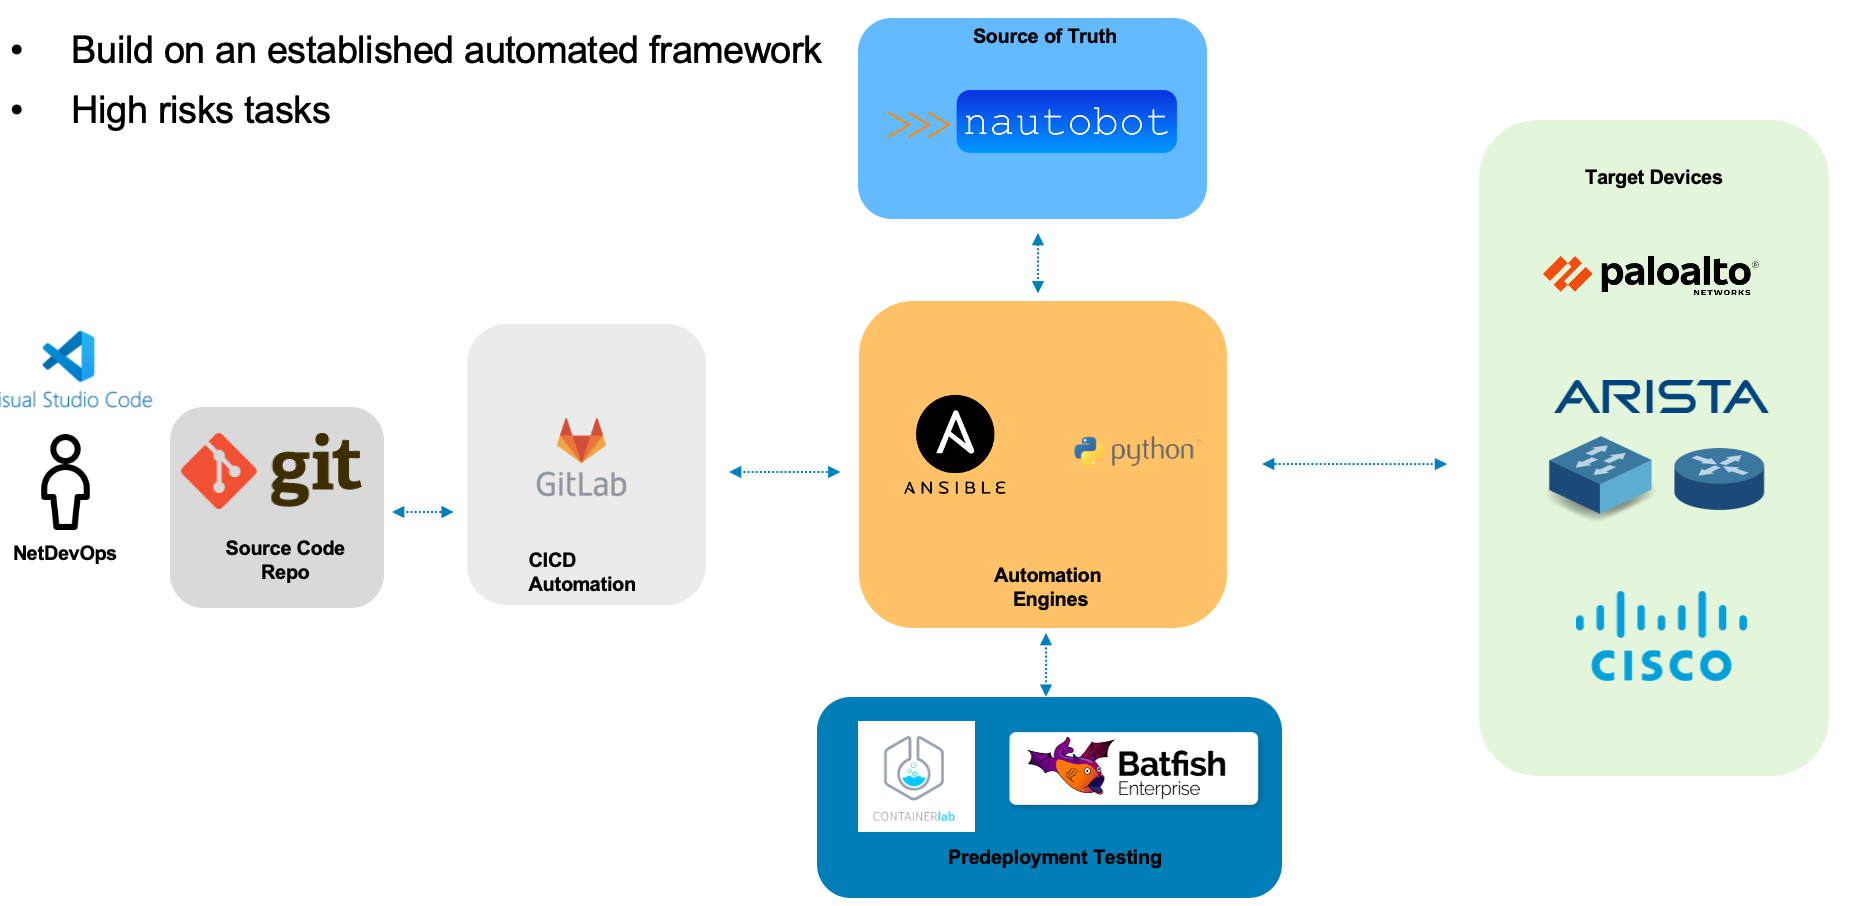
Here is a diagram of Stage 4. This shows all the technology we will be using in Stage 4.
It also defines the use cases we will be working on in Stage 4.
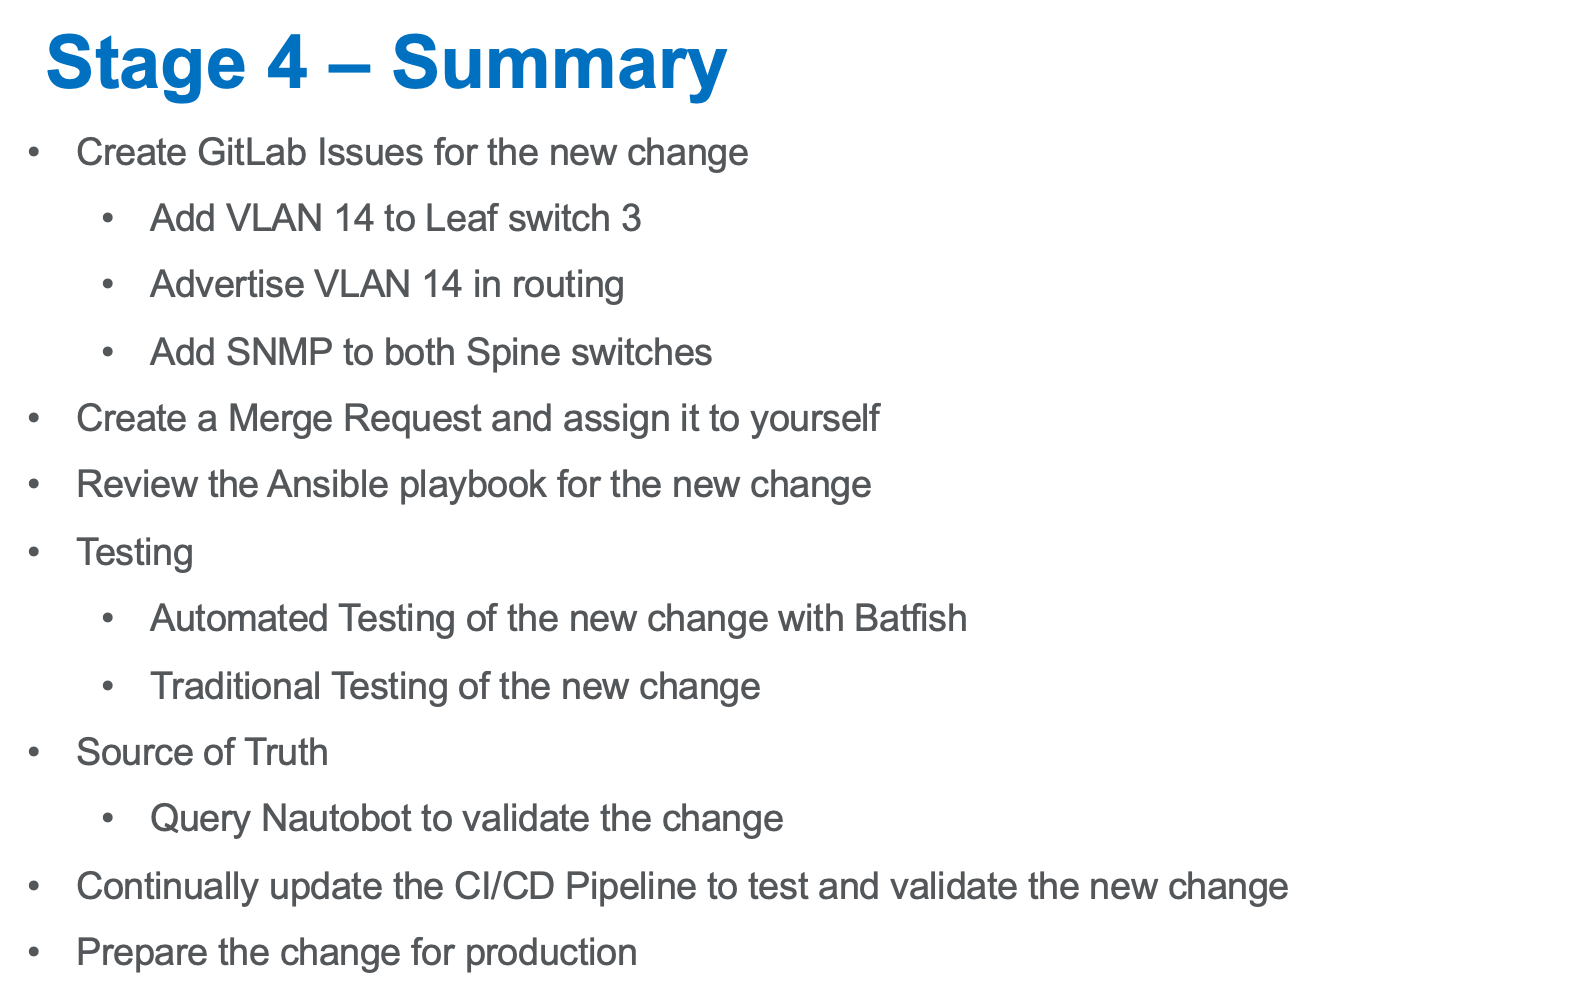
Here is a summary of Stage 4
Let’s Automate A Change
| Login to the Gitlab-CE Server (Server 2) as a user |
One of the first things to do to follow the Gitlab flow.
Create an issue in Gitlab to document the change.
By creating an issue we can link it to the change
Click on the Network Automation Project
Click Issues, then new issue
Provide a title Network Change for the issue and add the following description:
- [ ] Add a new Vlan and advertise it in BGP
- [ ] Add SNMP to the Spine Switches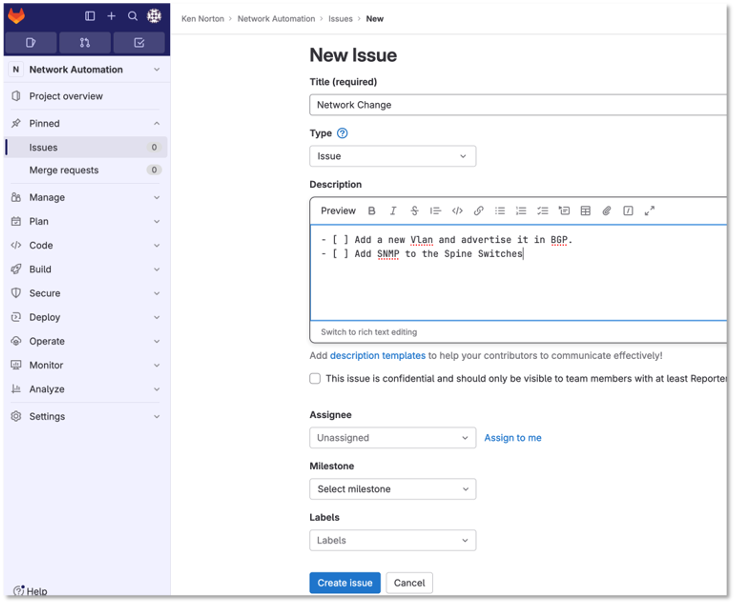
Figure 1: Network Change New Issue
Click preview and notice the checklist
Click create issue
Assign yourself to the issue on the far right

Figure 2: Network Change New Issue
| Write down the new branch name, 1-network-change |
Click create a merge request and new branch
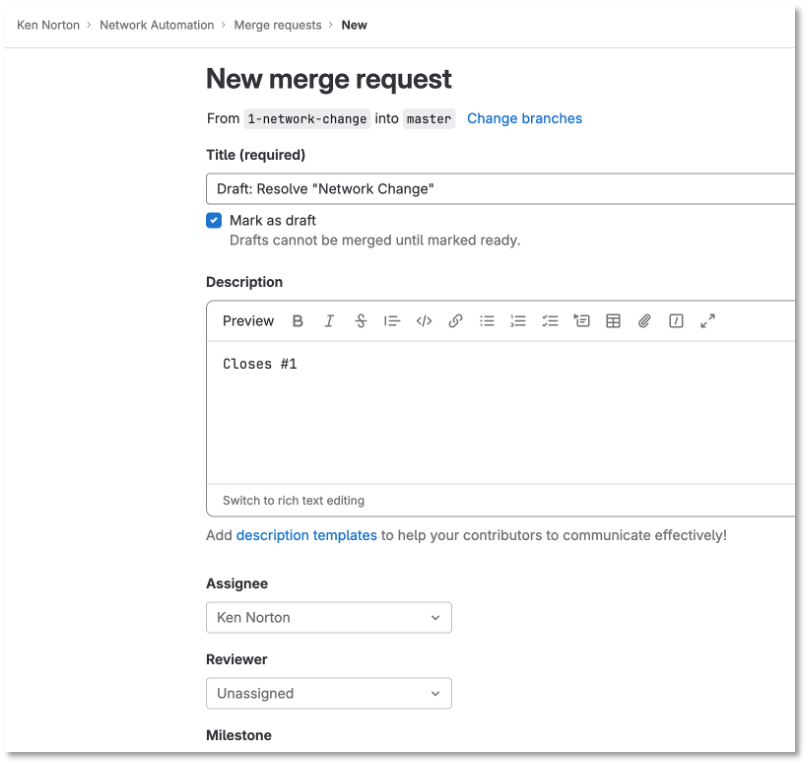
Figure 3: Merge Request
Click assign to me
Click create a merge request
| A Merge request doesn’t make any changes, but don’t close the merge request |
Click Code → Branches
Notice the new merge request, new issue, and new branch
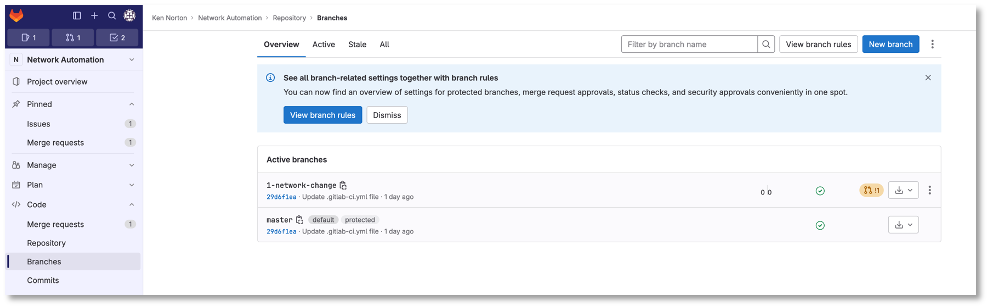
Figure 4: Code Branches
Let’s Go Bring Down The Latest Version Of The Repository
Go to a remote location where you have a copy of the remote repository from your Gitlab server
Perform the following to get latest copy of the remote repository
Lets use VS Code to make the change
git remote -v show origingit pull origin masterThe following output shows the progression of the commands above
kennorton@C02G71AFMD6P-knorton network-automation % git remote -v show origin (1)
* remote origin
  Fetch URL: http://ccoe-netdev-02.presidio-demo.com/knorton/network-automation.git
  Push  URL: http://ccoe-netdev-02.presidio-demo.com/knorton/network-automation.git
  HEAD branch: master
  Remote branches:
    1-network-change new (next fetch will store in remotes/origin)
    master           tracked
  Local ref configured for 'git push':
    master pushes to master (local out of date) (2)
kennorton@C02G71AFMD6P-knorton network-automation % git pull origin master (3)
remote: Enumerating objects: 21, done.
remote: Counting objects: 100% (21/21), done.
remote: Compressing objects: 100% (9/9), done.
remote: Total 21 (delta 12), reused 21 (delta 12), pack-reused 0
Unpacking objects: 100% (21/21), 2.16 KiB | 116.00 KiB/s, done.
From http://ccoe-netdev-02.presidio-demo.com/knorton/network-automation
 * branch            master     -> FETCH_HEAD
   fcc23a4..a0e0264  master     -> origin/master
Updating fcc23a4..a0e0264
Fast-forward
 .gitlab-ci.yml | 31 +++++++++++++++++++++++++++++++
 1 file changed, 31 insertions(+)
 create mode 100644 .gitlab-ci.yml
| 1 | Check the remote repository |
| 2 | Notice the local repository is out of date |
| 3 | Pull down the changes from the remote repository |
Perform the following command to see the status of the branches
git branchNotice the only branch is master. We can pull down the remote network change branch using the following command, but we need to create a local branch:
git fetchYou need to create a new local branch in the local repository using the following command:
git branch 1-network-changeThen let’s switch to that branch with the following command:
git checkout 1-network-changeThe following output shows the progression of the commands above
kennorton@C02G71AFMD6P-knorton network-automation % git branch --all
* master
  remotes/origin/master
kennorton@C02G71AFMD6P-knorton network-automation % git fetch
From http://ccoe-netdev-02.presidio-demo.com/knorton/network-automation
 * [new branch]      1-network-change -> origin/1-network-change
kennorton@C02G71AFMD6P-knorton network-automation % git branch --all
* master
  remotes/origin/1-network-change
  remotes/origin/master
kennorton@C02G71AFMD6P-knorton network-automation % git branch
* master
kennorton@C02G71AFMD6P-knorton network-automation % git branch 1-network-change
kennorton@C02G71AFMD6P-knorton network-automation % git branch
  1-network-change
* master
kennorton@C02G71AFMD6P-knorton network-automation % git checkout 1-network-change
Switched to branch '1-network-change'
Let’s Create A Change
Let’s build an Ansible Playbook to create the change
Let’s continue to use Visual studio code to create the change
Let’s review the files in the change directory
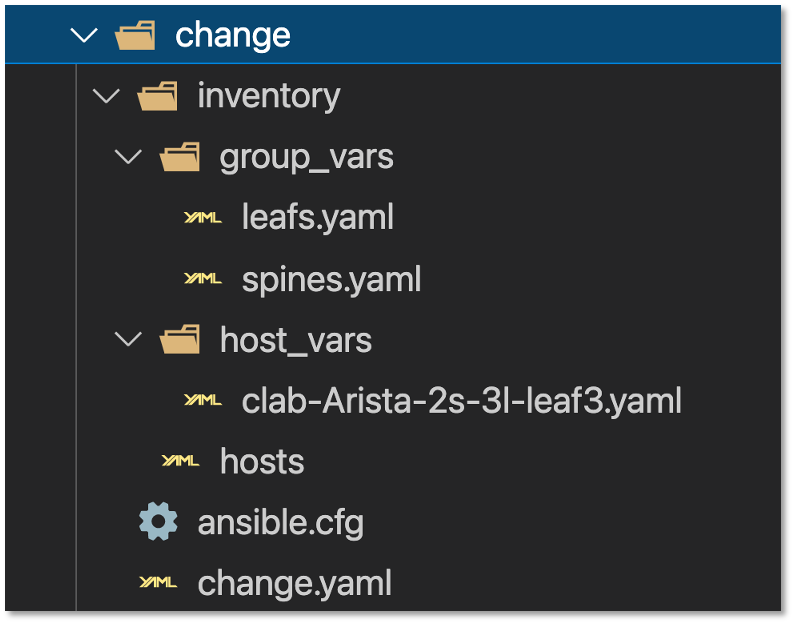
Figure 5: Network Change File Structure
Let’s review the hosts file:
all:
  children:
    leafs:
      hosts:
        clab-Arista-2s-3l-leaf3:
    spines:
      hosts:
        clab-Arista-2s-3l-spine1:
        clab-Arista-2s-3l-spine2:
Notice only one leaf switch and 2 spine switches
The change will only be deployed to those three devices
Let’s review the host_vars in clab-Arista-2s-3l-leaf3.yaml:
These are the variables defined to add a new vlan interface to leaf3
By creating this yaml file you can simplify the addition of vlan interfaces in the future
| This can be the one file completed by a help desk user in the future. Easy to read without having to understand the commands required to configure the switches |
---
configuration:
  vlans:
    vlan: 14
  ip_addr:
    ip: "192.168.14.1"
    mask: 24
Let’s review the change.yaml file:
---
- name: MAKE CHANGE ON SPINE ARISTA SWITCHES
  hosts: spines (1)
  gather_facts: false
  connection: network_cli
  tasks:
    - name: CONFIGURE SNMP ON SPINES
      arista.eos.eos_snmp_server:
        config:
          communities:
            - name: "netdevops"
              acl_v4: "list3"
              view: "view1"
          contact: "admin"
          hosts:
            - host: "host02"
              version: "2c"
              user: "user1"
          traps:
            capacity:
              arista_hardware_utilization_alert: True
            bgp:
              enabled: True

- name: MAKE CHANGE ON LEAF ARISTA SWITCHES
  hosts: leafs (2)
  gather_facts: false
  connection: network_cli
  tasks:
    - name: ADD VLAN {{ configuration.vlans.vlan }}
      eos_config:
        lines:
          - vlan {{ configuration.vlans.vlan }}
    - name: RECONFIGURE INTERFACE ETHERNET 3
      eos_config:
        parents: interface ethernet 3
          lines:
            - switchport access vlan {{ configuration.vlans.vlan }}
    - name: CONFIGURE INTERFACE VLAN {{ configuration.vlans.vlan }}
      eos_config:
        parents: interface vlan {{ configuration.vlans.vlan }}
          lines:
            - ip address virtual {{ configuration.ip_addr.ip }}/{{ configuration.ip_addr.mask }}
| 1 | We are only making the following SNMP changes to the spine switches defined in the host file |
| 2 | The following are the changes to the leaf switches to add a new vlan and vlan interface: |
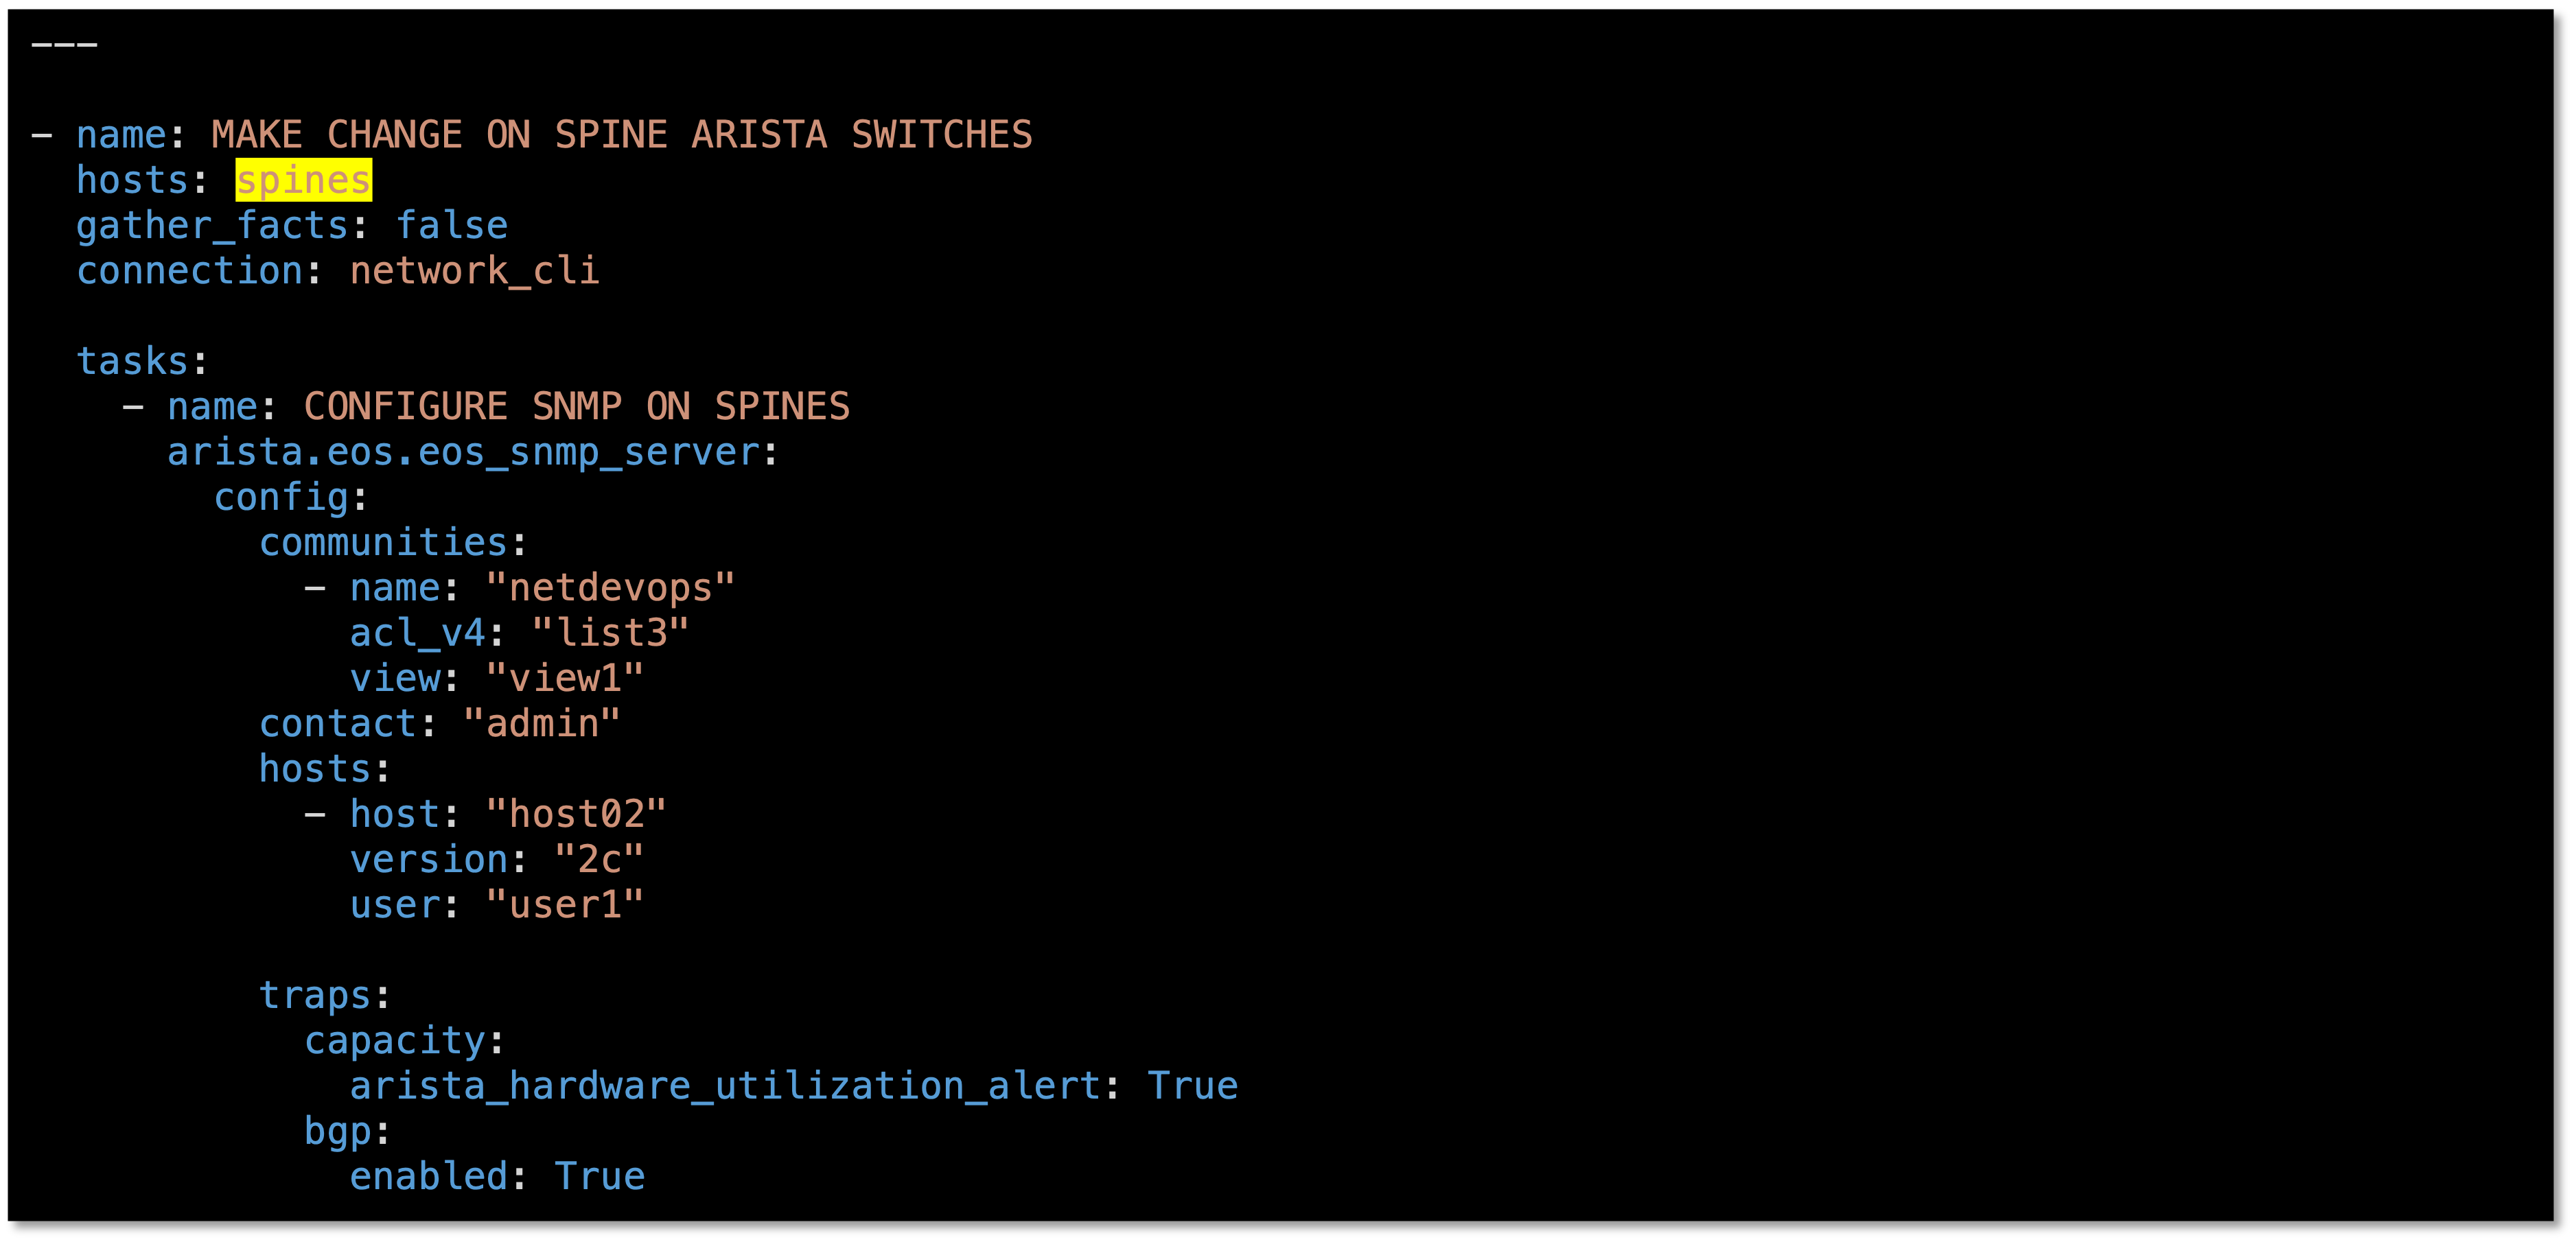
Figure 6: Ansible Playbook For The Change For Spines
We are using Jinja2 templating to reference the hosts_vars we previously reviewed
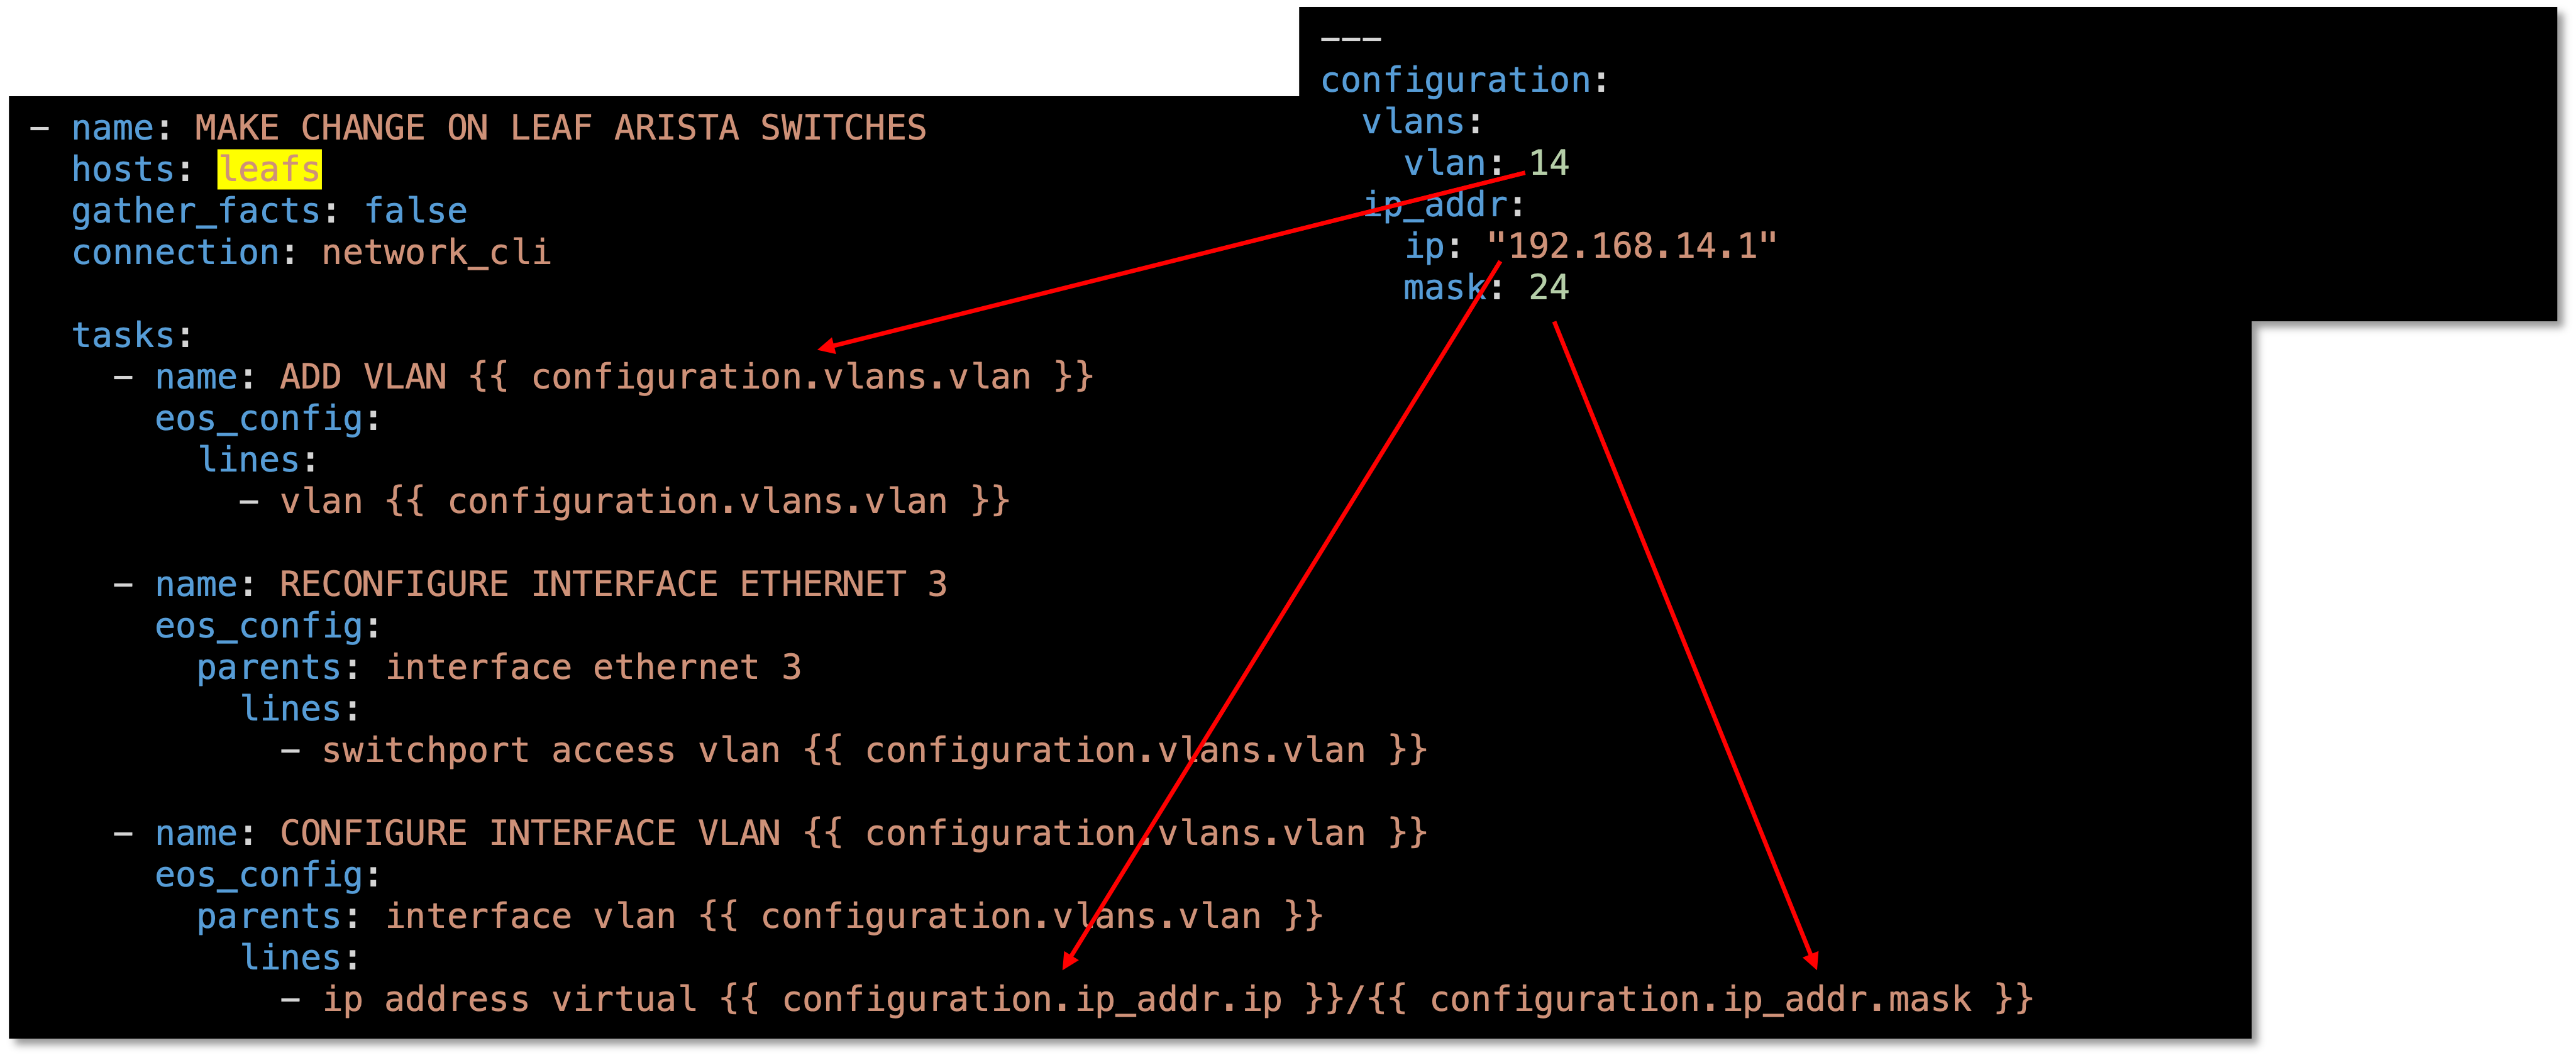
Figure 7: Ansible Playbook For The Change For Leaves
Take a look at the clab-Arista-2s-3l-leaf3.yaml and pay attention to the structure
The file starts with configuration and then goes to vlans and then vlan
Now we need to add the change to CI/CD pipeline
Using VS Code keep all the current configuration in the gitlab-ci.yml file, we just need to add to it
Add the following workflow and stage to the gitlab-ci.yml file using Visual Studio Code
---
workflow: (1)
  rules:
    - if: $CI_COMMIT_TAG
      when: never
    - if: $CI_COMMIT_BRANCH == 'master'

stages:
  - build
  - stage
  - change (2)
  - backup

network_change: (3)
  stage: change
  before_script:
    - cd change
  script:
    - ansible-playbook change.yaml -v
  dependencies:
- staging_switches| 1 | Copy and paste the workflow section to the top of the .gitlab.ci file |
| 2 | Add the - change stage to the stages section between stage and backup |
| 3 | Copy and paste the network change stage in between the staging_switches stage and the backup_switches stage. |
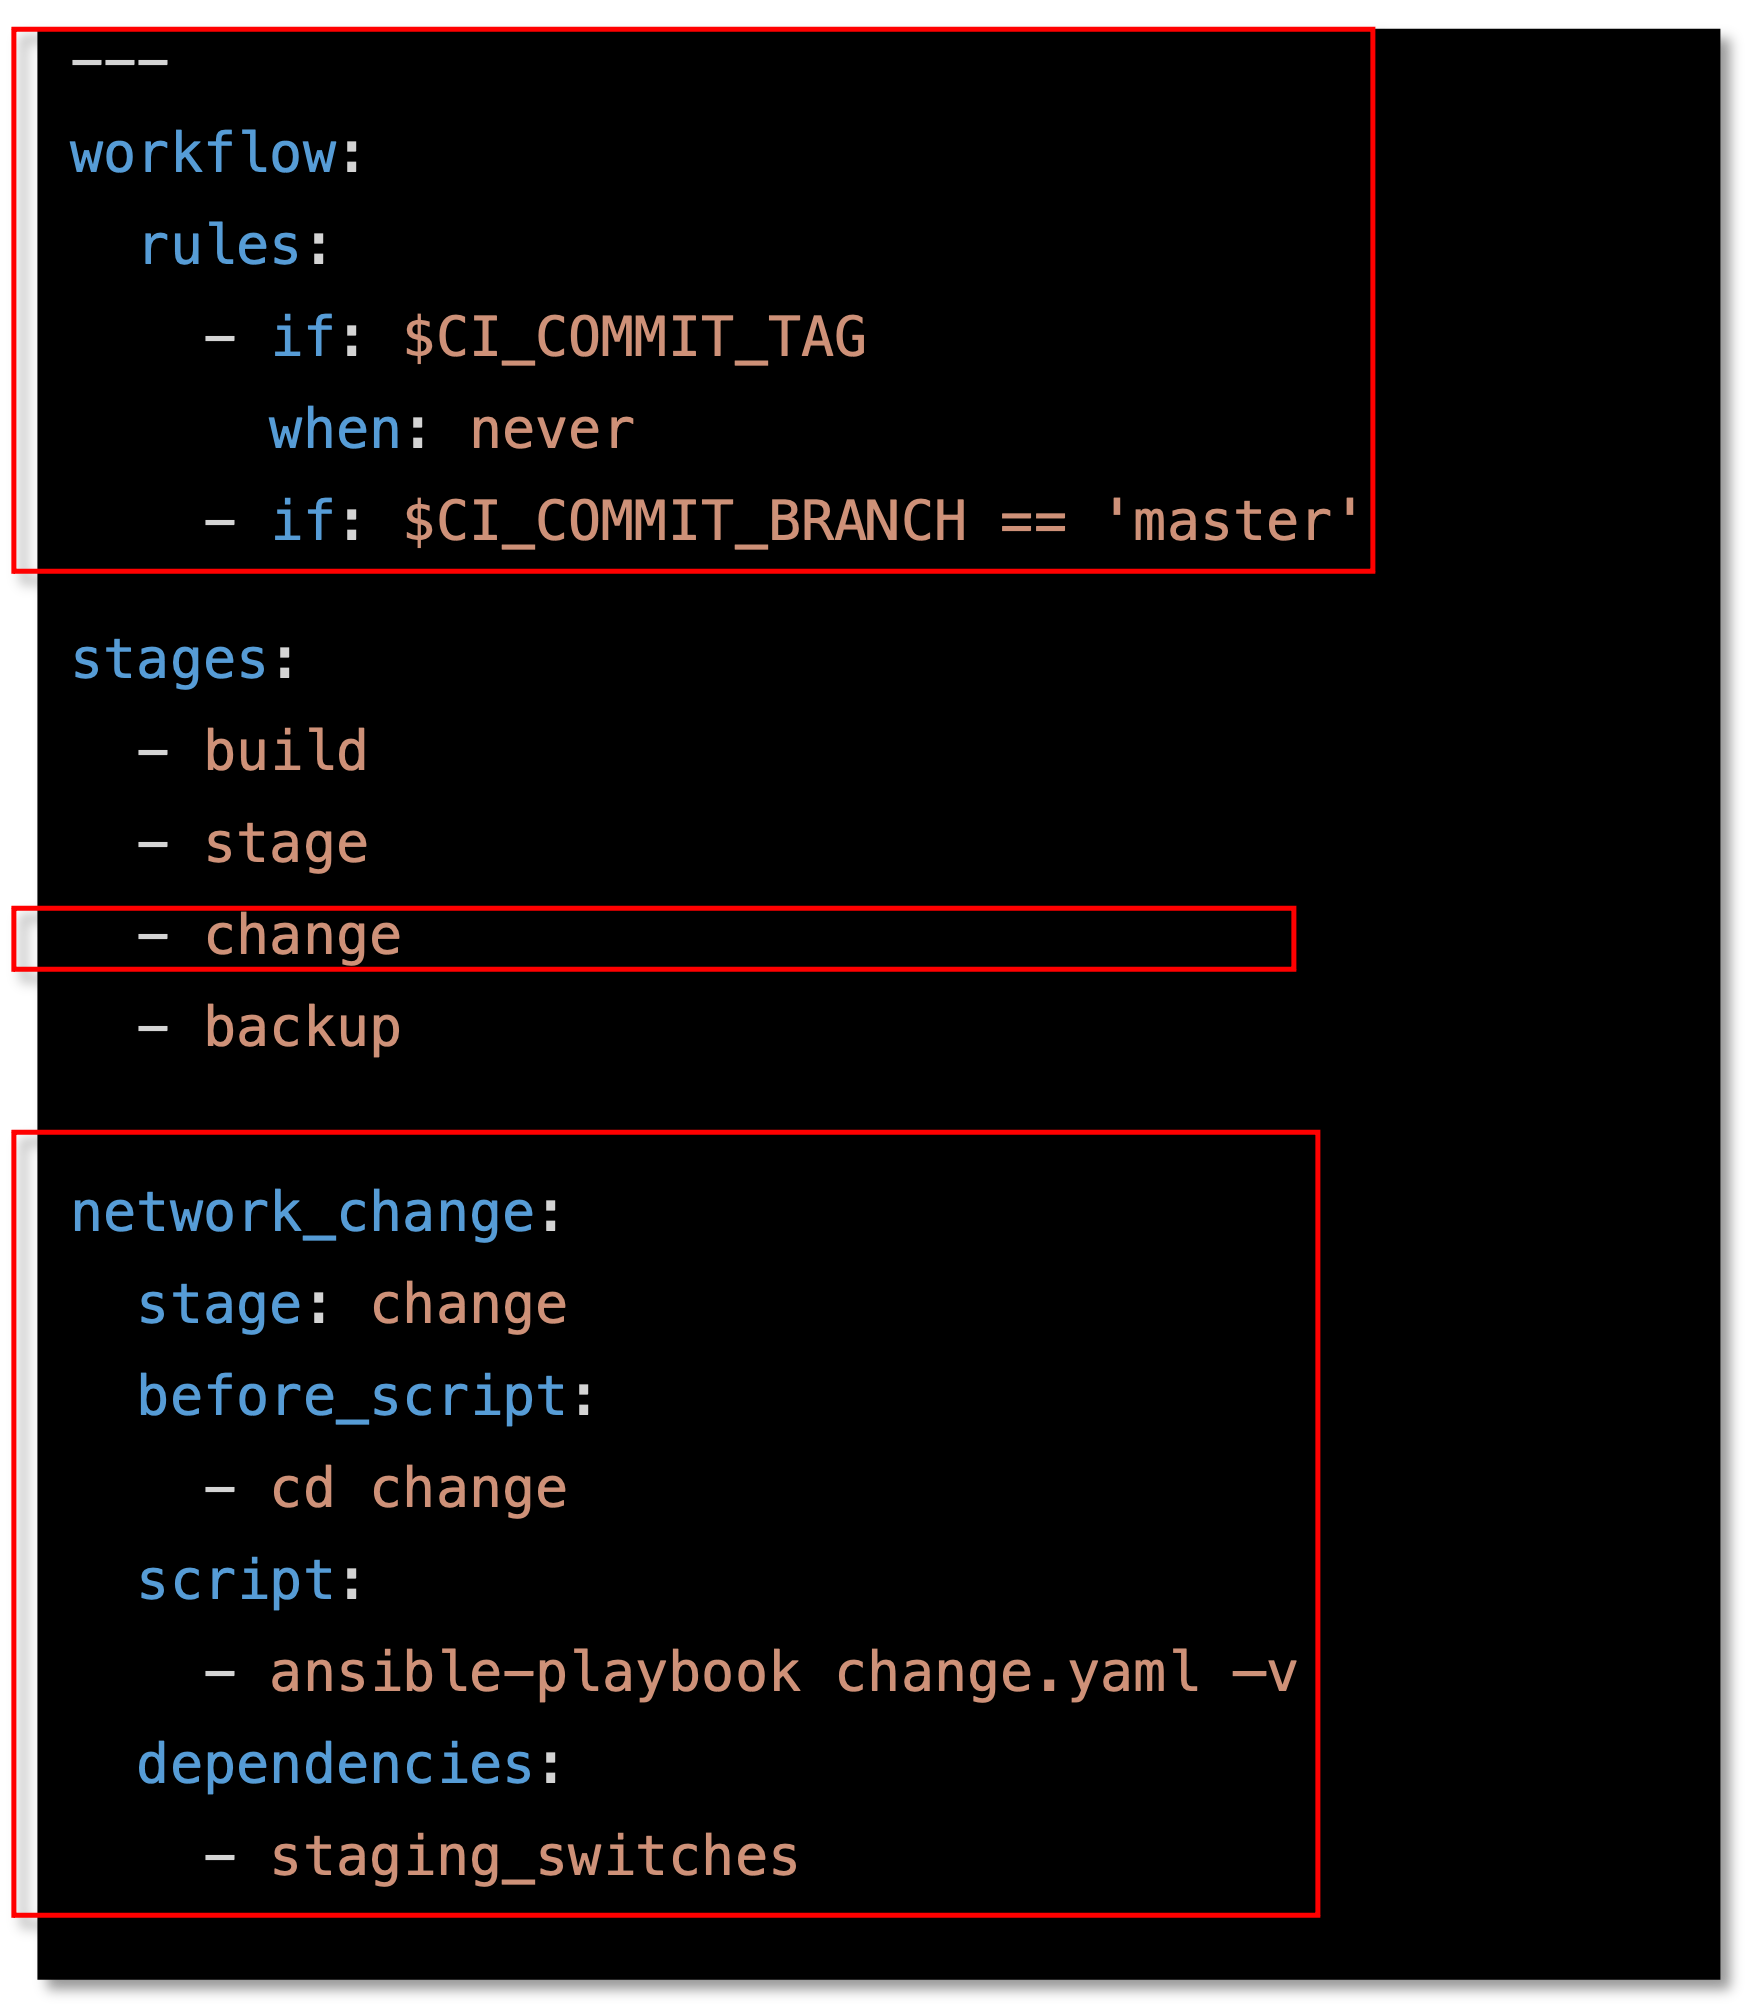
Figure 8: Changes For The CI/CD Pipeline
Complete .gitlab-ci.yml file
Copy and paste this if you run into problems with your pipeline
---

workflow:
  rules:
    - if: $CI_COMMIT_TAG
      when: never
    - if: $CI_COMMIT_BRANCH == 'master'

stages:
  - build
  - stage
  - change
  - backup

build_switches:
  stage: build
  before_script:
    - cd infra
  script:
    - sudo containerlab destroy -t ceos_2spine_3leaf.yaml || true
    - sudo -E CLAB_LABDIR_BASE=/var/clab containerlab deploy -t ceos_2spine_3leaf.yaml || true

staging_switches:
  stage: stage
  before_script:
    - cd build
  script:
    - sleep 60
    - pip install ansible-pylibssh
    - ansible-galaxy collection install arista.eos
    - ansible-playbook build.yaml -v

network_change:
  stage: change
  before_script:
    - cd change
  script:
    - ansible-playbook change.yaml -v
  dependencies:
    - staging_switches


backup_switches:
  stage: backup
  before_script:
    - cd backup
  script:
    - ansible-playbook playbooks/git_backup.yaml -v
  dependencies:
    - staging_switches
Now lets go push the changes to the remote repository
These are new changes made in the VS Code editor
git status
git add .gitlab-ci.yml
git commit -m "network change to add new vlan and update SNMP on Spine switches"
git push origin 1-network-change
The following output shows the progression of the commands above
kennorton@C02G71AFMD6P-knorton:~/network-automation$ git status
On branch 1-network-change
Changes not staged for commit:
  (use "git add <file>..." to update what will be committed)
  (use "git restore <file>..." to discard changes in working directory)
        modified:   .gitlab-ci.yml

no changes added to commit (use "git add" and/or "git commit -a")
kennorton@C02G71AFMD6P-knorton:~/network-automation$ git add .gitlab-ci.yml (1)
kennorton@C02G71AFMD6P-knorton:~/network-automation$ git commit -m "network change to add new vlan and update SNMP on Spine switches" (2)
[1-network-change 70478d8] network change to add new vlan and update SNMP on Spine switches
 1 files changed, 18 insertions(+)
kennorton@C02G71AFMD6P-knorton:~/network-automation$ git push origin 1-network-change (3)
Enumerating objects: 5, done.
Counting objects: 100% (5/5), done.
Delta compression using up to 12 threads
Compressing objects: 100% (3/3), done.
Writing objects: 100% (3/3), 510 KiB | 510 KiB/s, done.
Total 3 (delta 2), reused 0 (delta 0)
remote:
remote: To create a merge request for 1-network-change, visit:
remote:   http://ed26757f4b2c.mylabserver.com/knorton/network-automation/-/merge_requests/new?merge_request%5Bsource_branch%5D=1-network-change
remote:
To http://ed26757f4b2c.mylabserver.com/knorton/network-automation.git
 * [new branch]      1-network-change -> 1-network-change
| 1 | git add of the .gitlab-ci.yml file |
| 2 | git commit to add the change to local repository |
| 3 | git push to push the code to the server and kickoff the pipeline |
Go to the Gitlab-CE Server
Go to Merge Requests
Click on the Draft Network Change Merge Request
Notice the Merge Request update
Under Activity you can review the changes
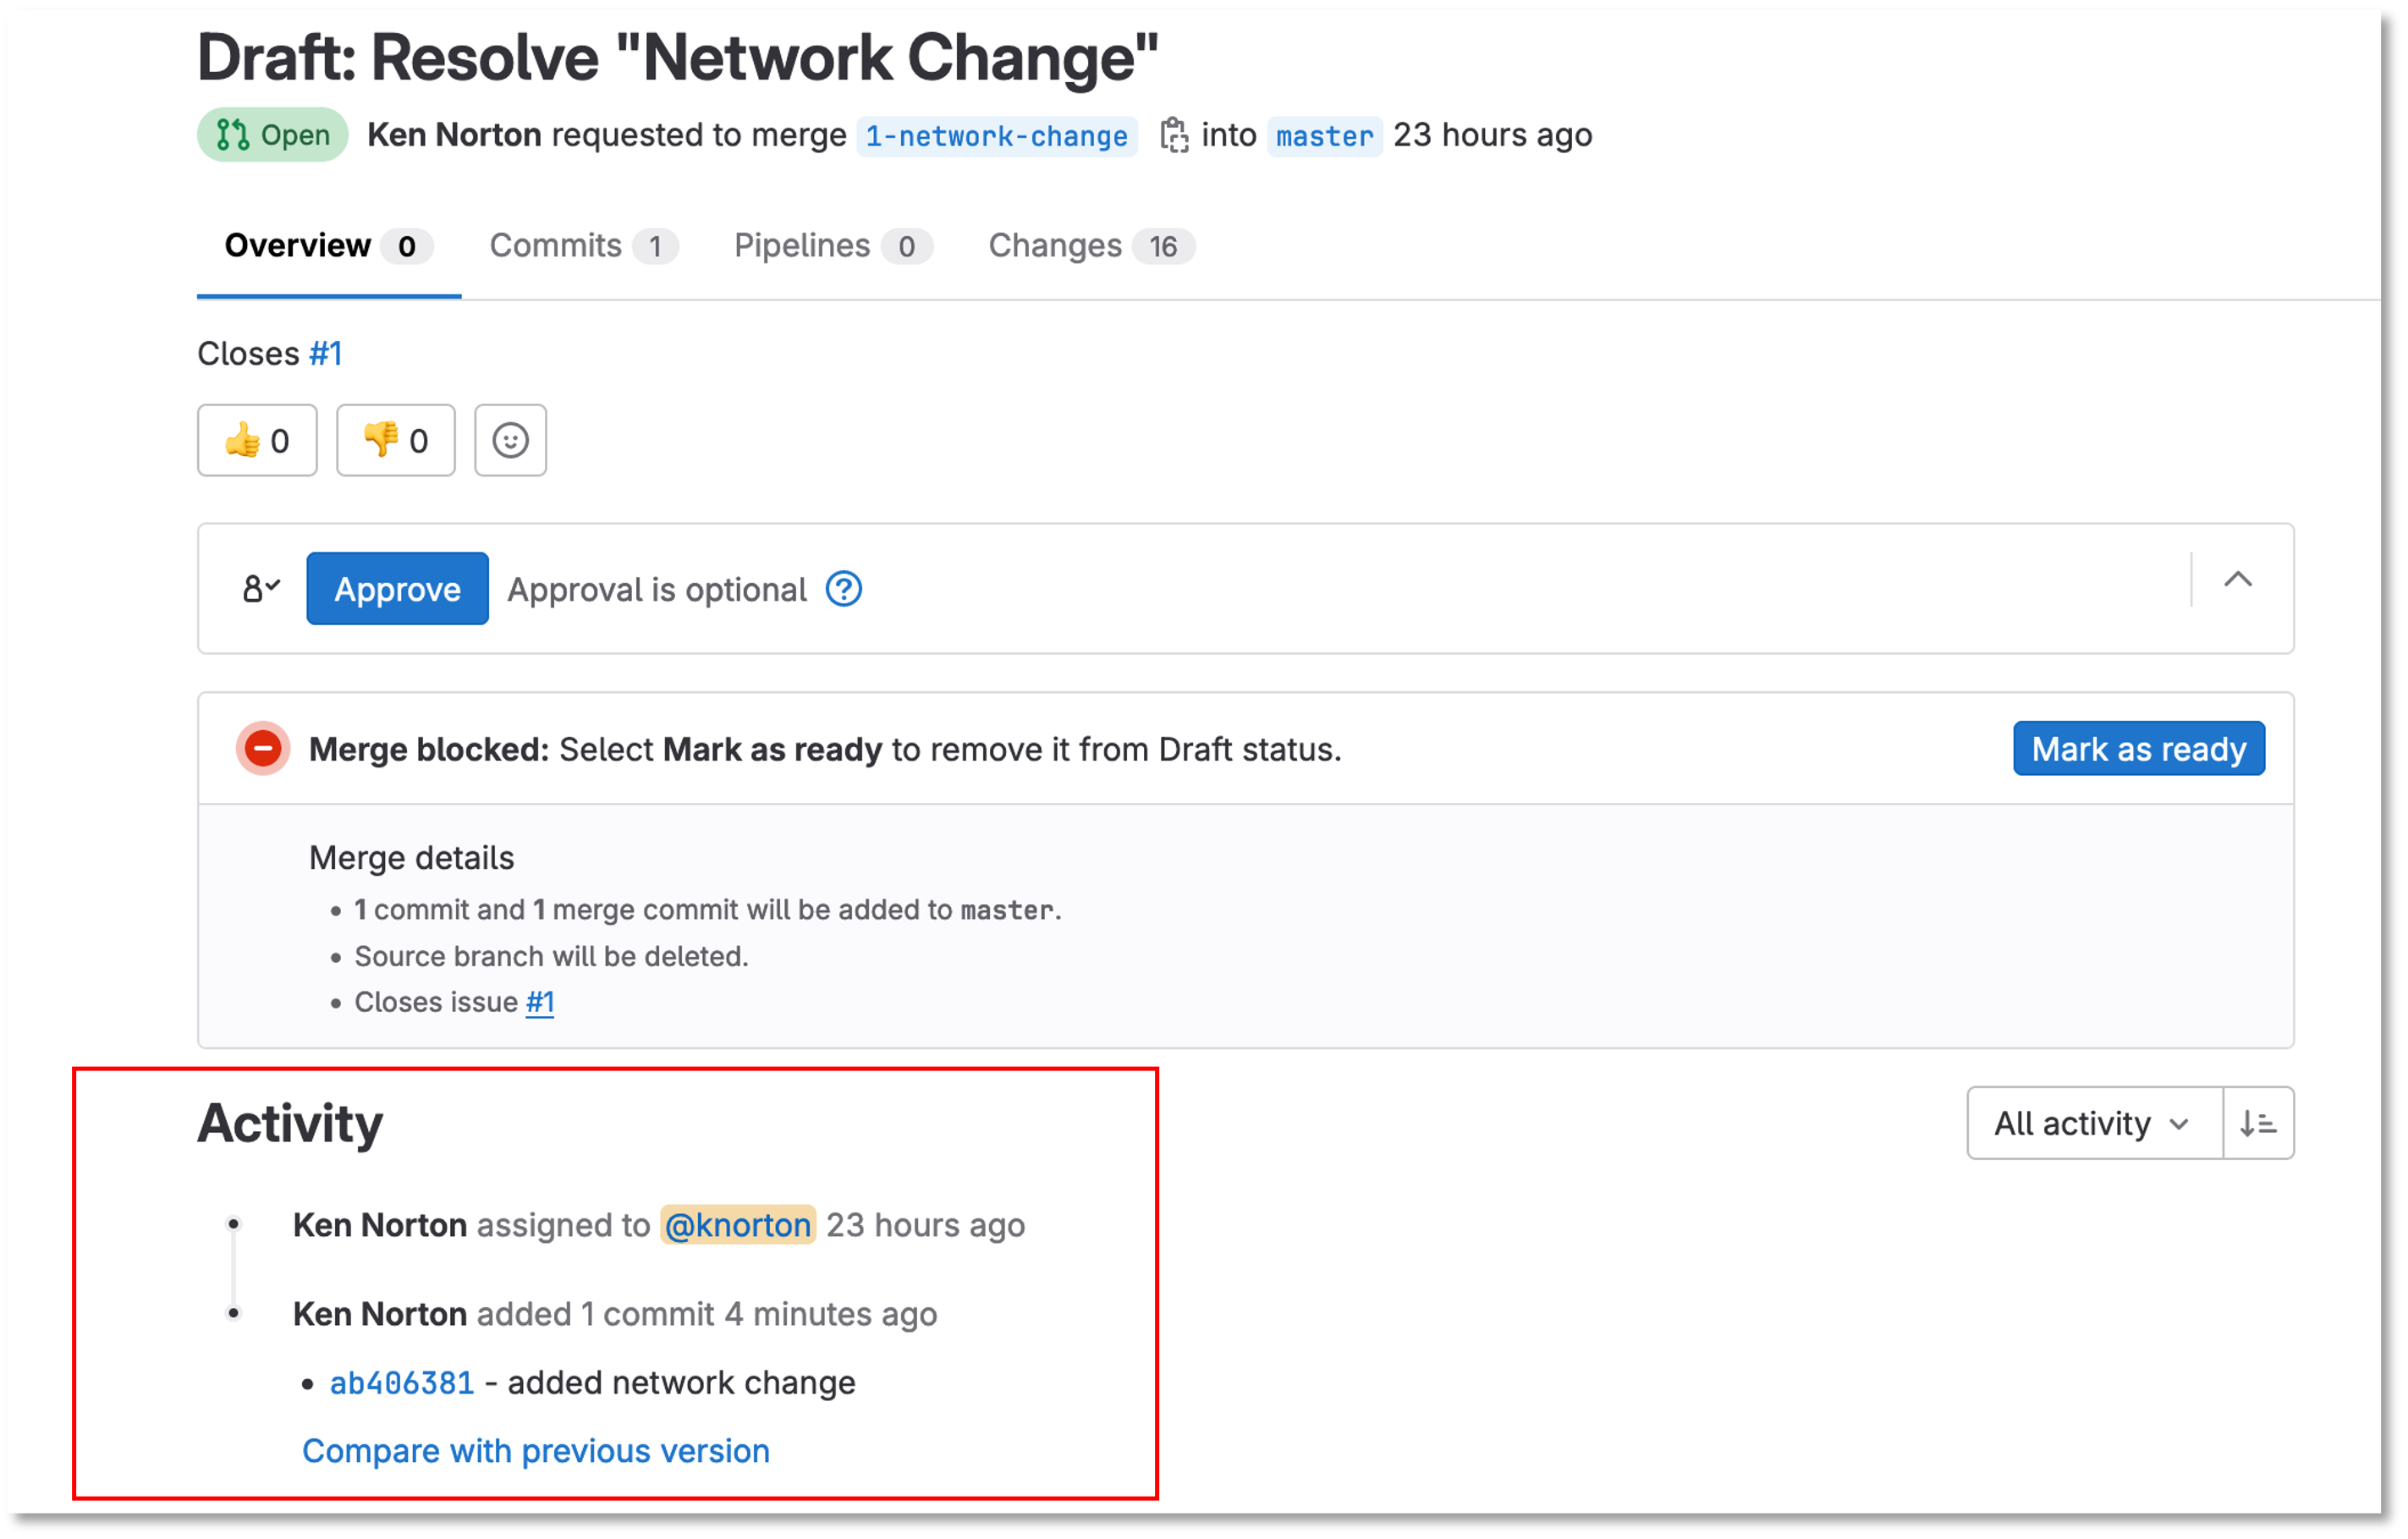
Figure 9: Network Change Merge Request
| Click the ab406831 link to review the changes. The link ID will be different |
Notice how the git push didn’t automatically kickoff the CI/CD pipeline.
By adding the following workflow to the gitlab-ci.yml file it pauses the pipeline so it can be reviewed before it is merged into the master branch
workflow:
  rules:
    - if: $CI_COMMIT_TAG
      when: never
    - if: $CI_COMMIT_BRANCH == 'master'
Take a look at the changes
You can make comments on the change and add a to do if needed
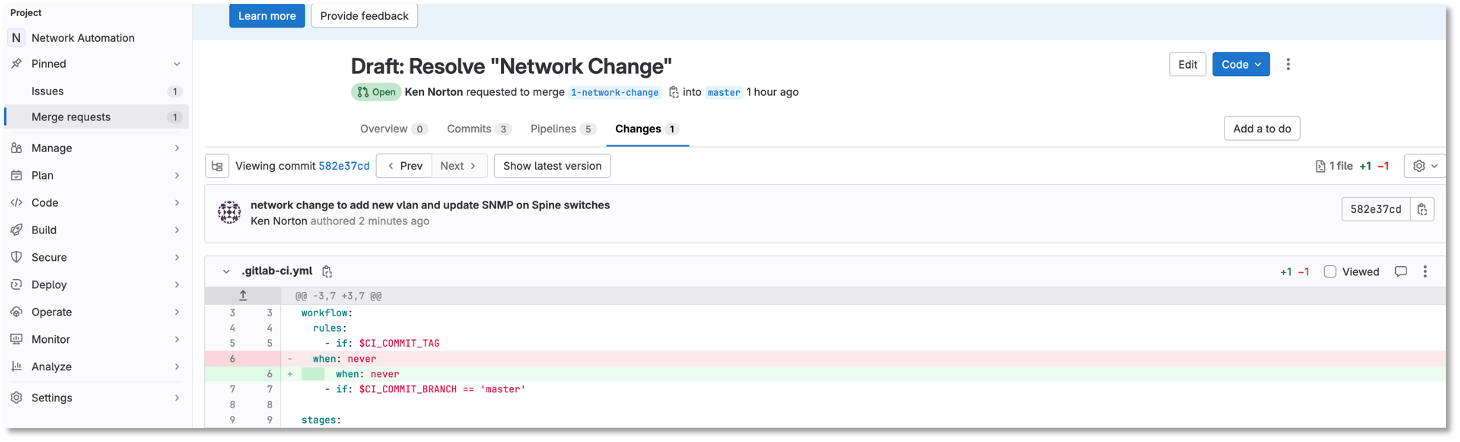
Figure 10: Network Change Merge Request Changes
Go back to Merge Request after reviewing the changes and click Mark as ready

Figure 11: Network Change Merge Request Mark Ready
Once you click Mark as ready, you are ready to merge the 1-network-change branch into master
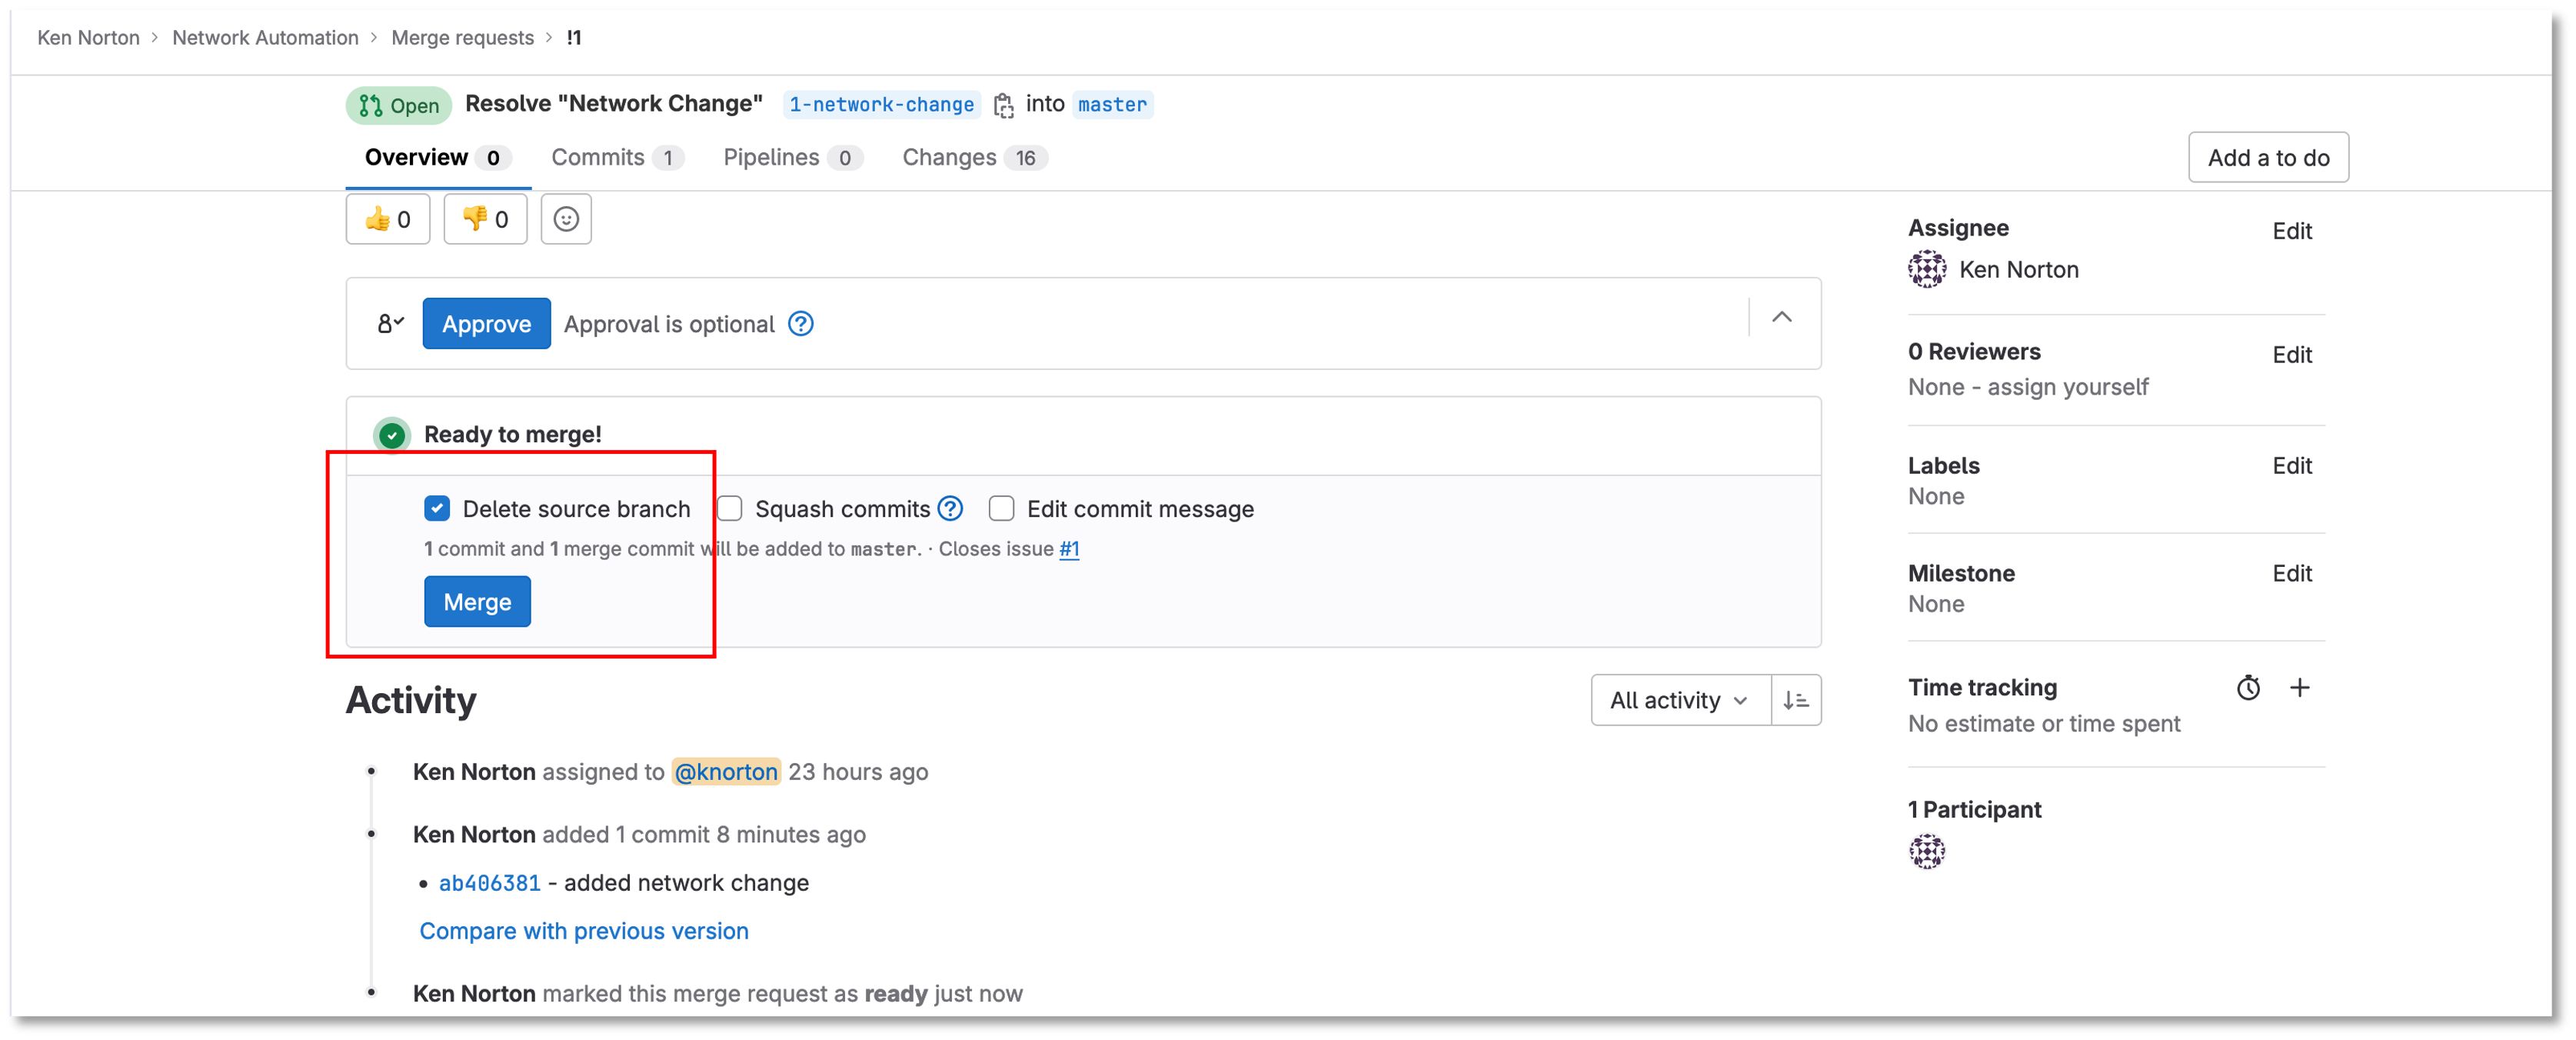
Figure 12: Network Change Merge The Request
Click Merge and leave the Delete source branch checked
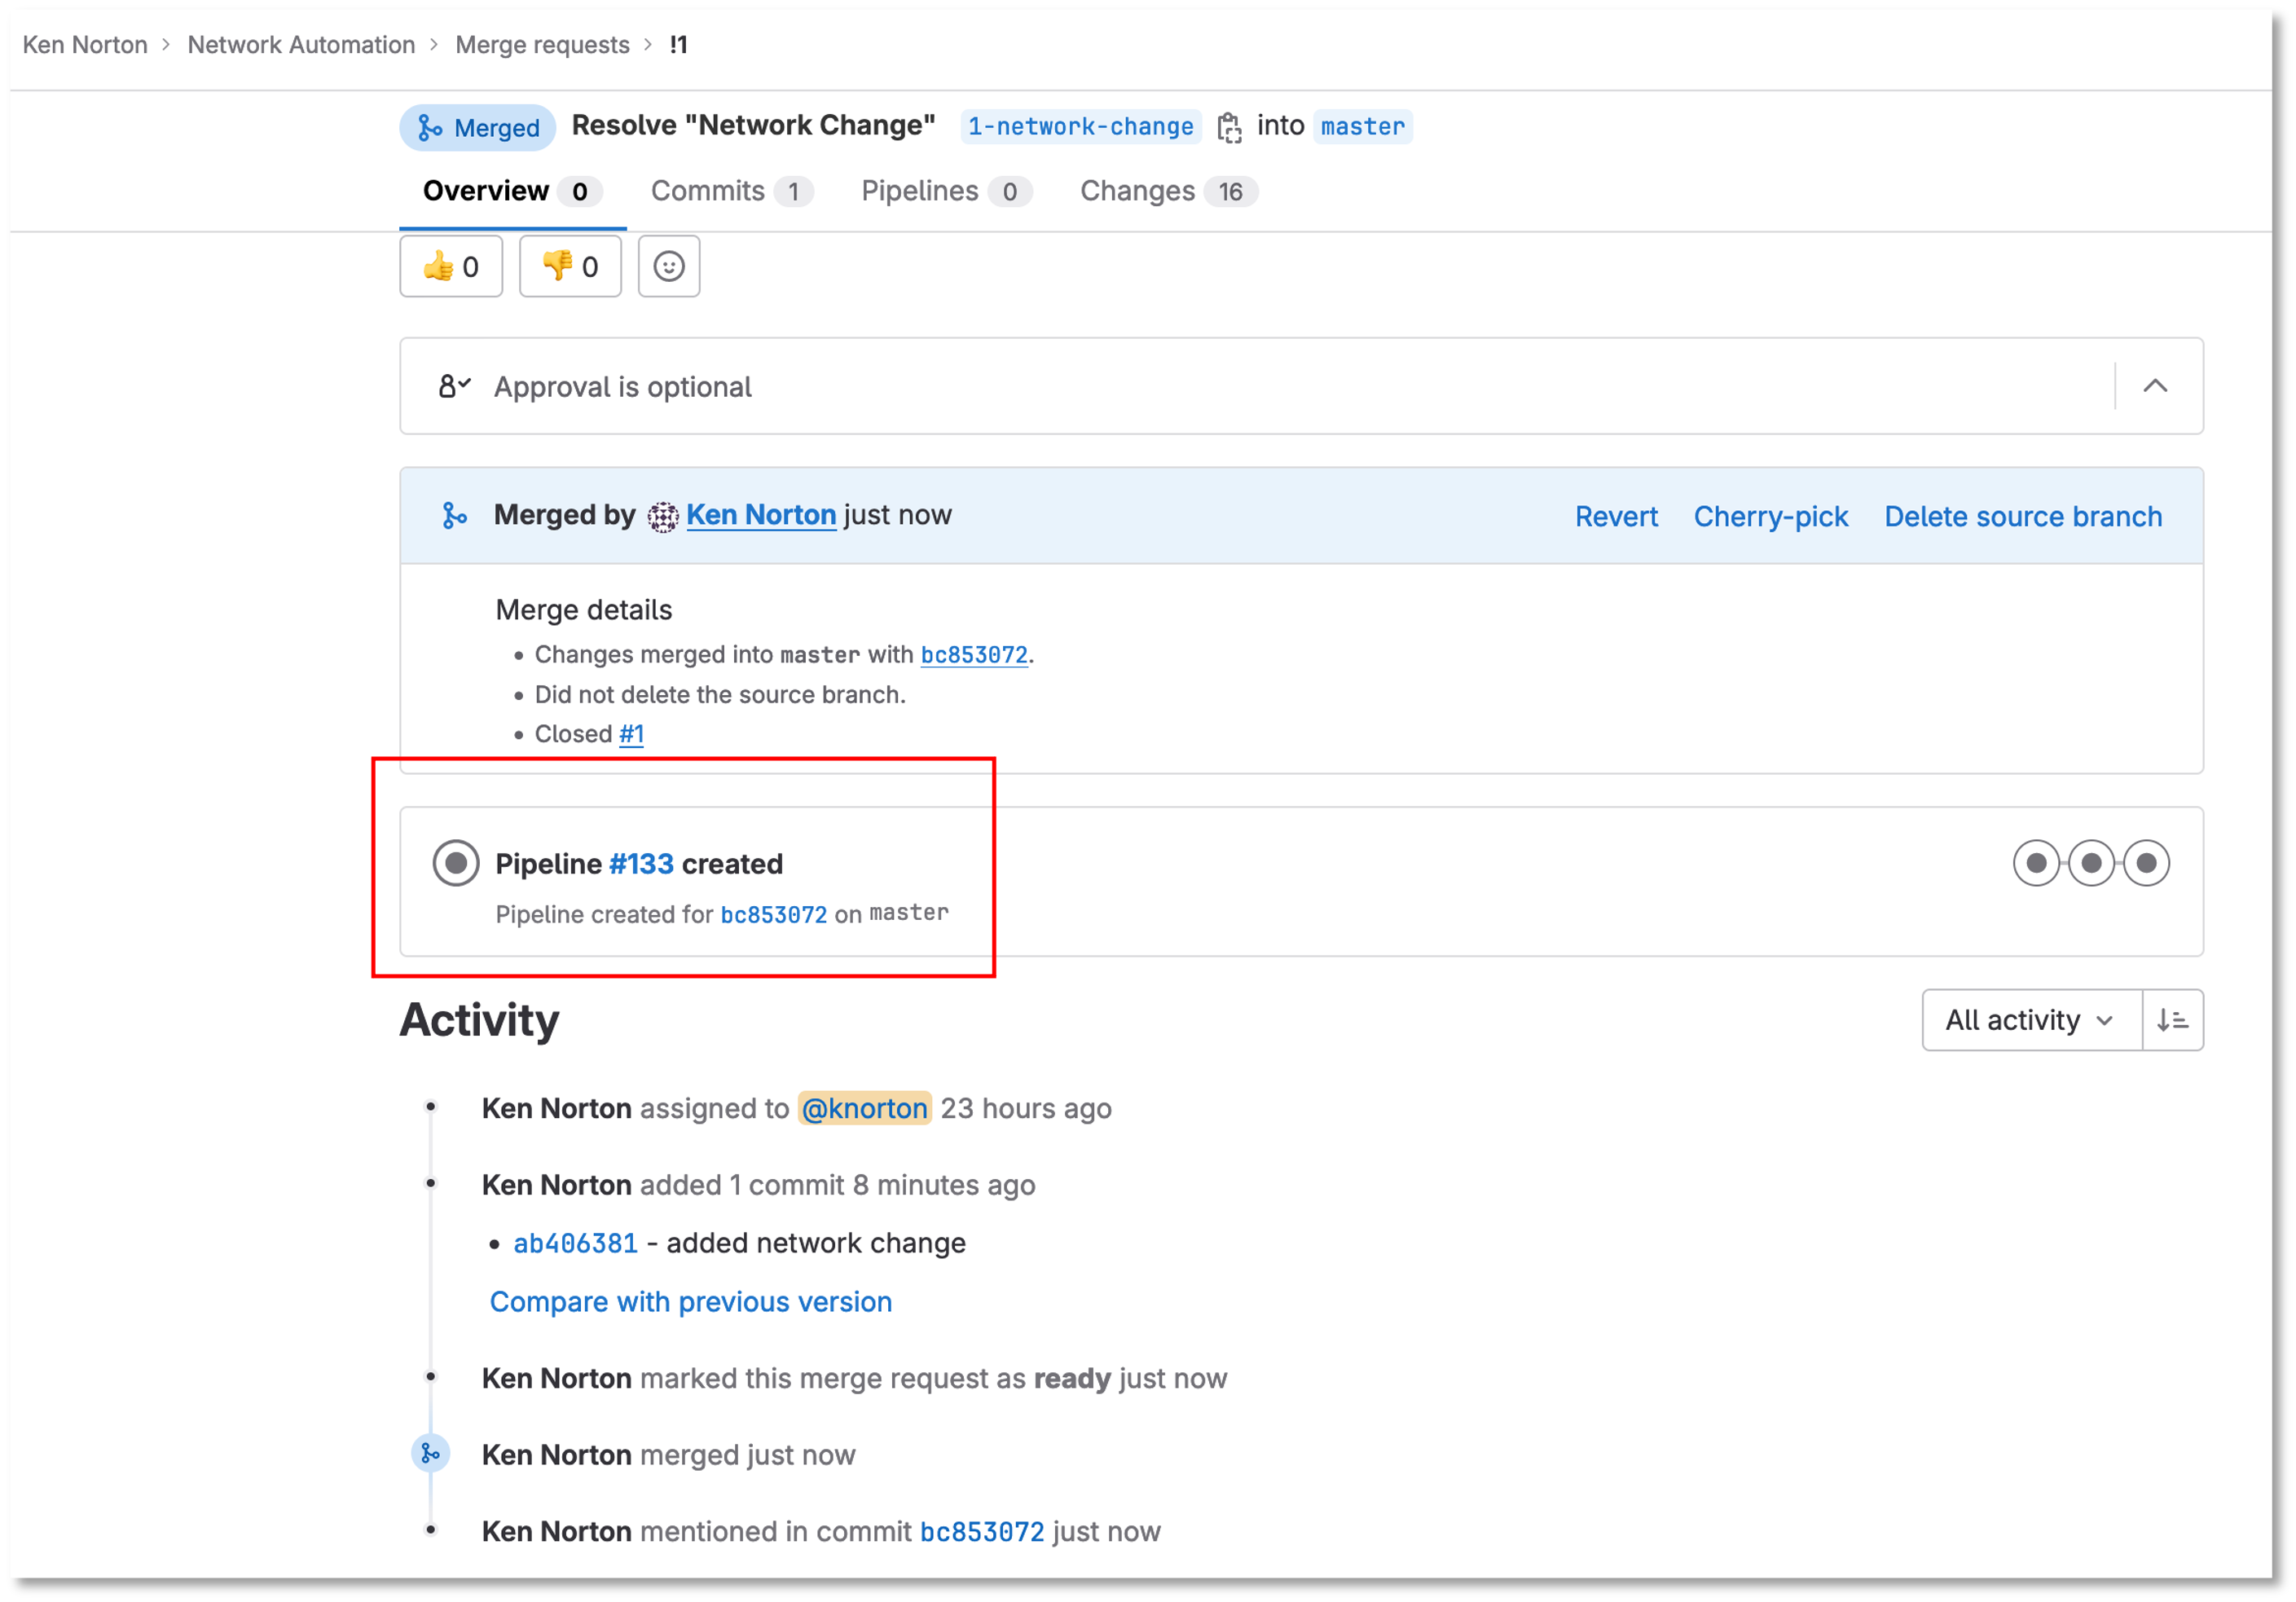
Figure 13: Network Change Merge The Pipeline Starts
Under the build section
Click on the pipeline
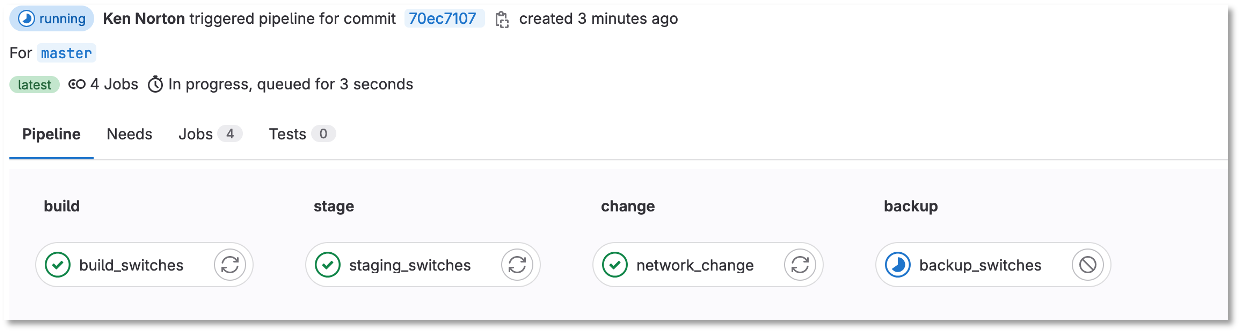
Figure 14: Network Change Merge The Pipeline
When the pipeline completes the issue will automatically close
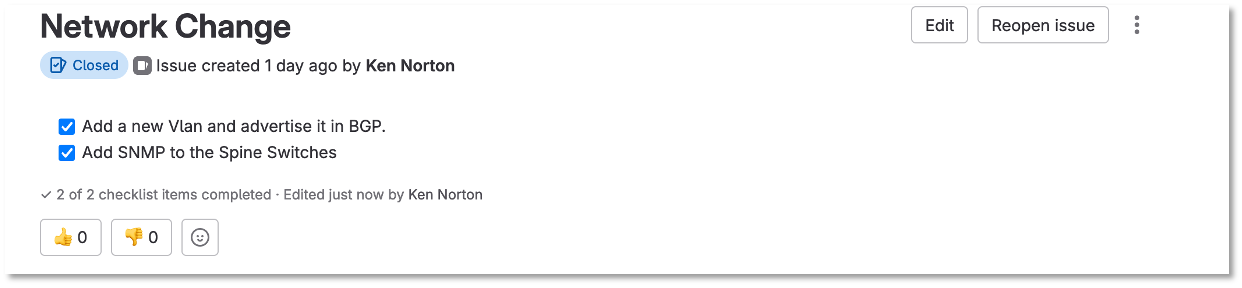
Figure 18: Network Change Resolve The Issues