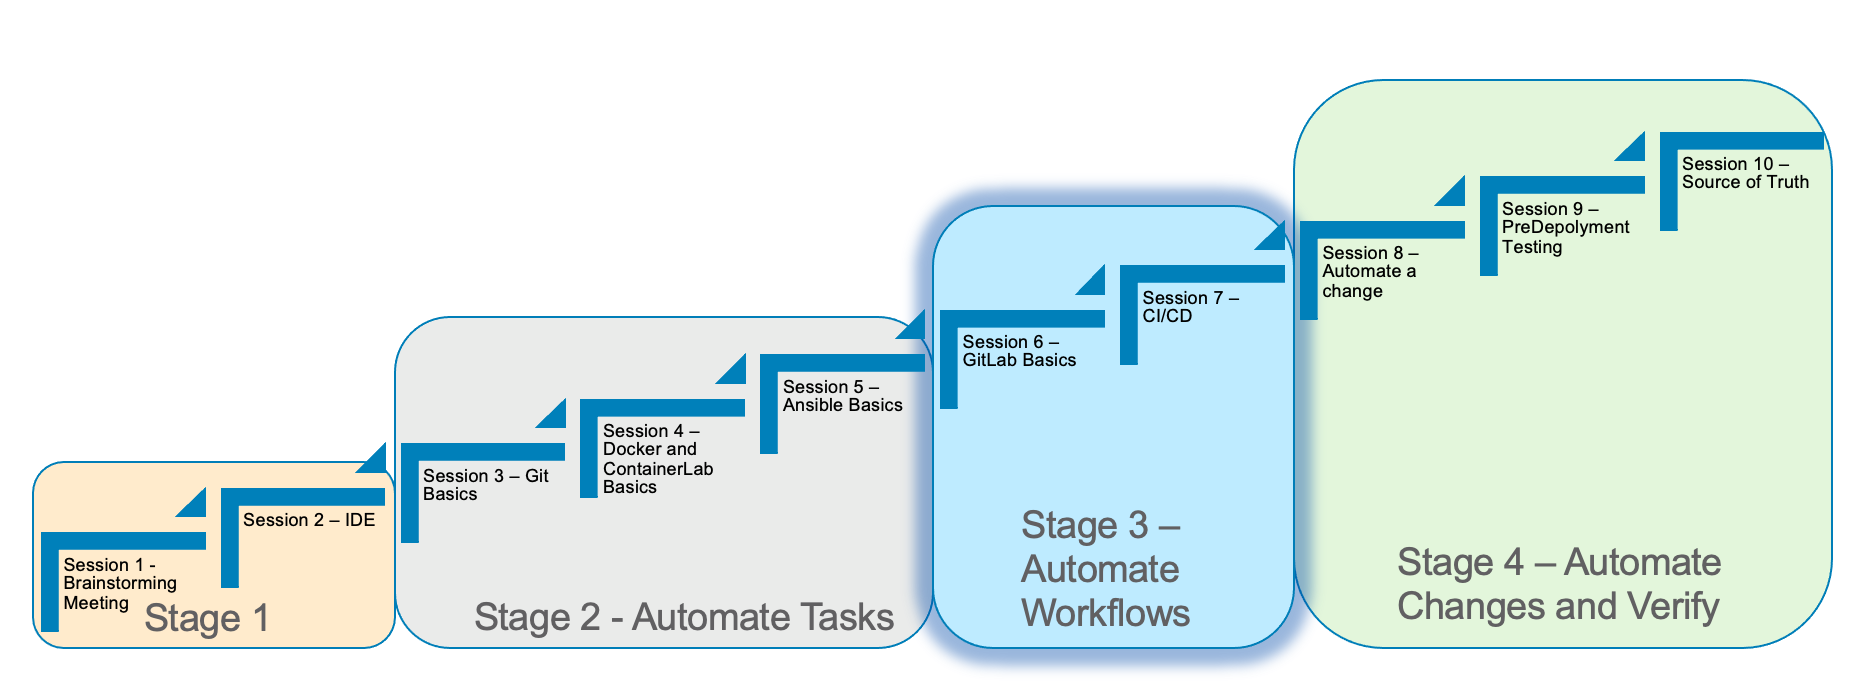
Stage 3 CI/CD Basics
Estimated time to complete: 45 minutes
In Stage 3, we will discuss Continous Integration and Continous Deployment basics (CI/CD).
We will run through some of the concepts to understand the power of CI/CD.
CI/CD is the glue to automate the workflow for deploying network infrastructure.
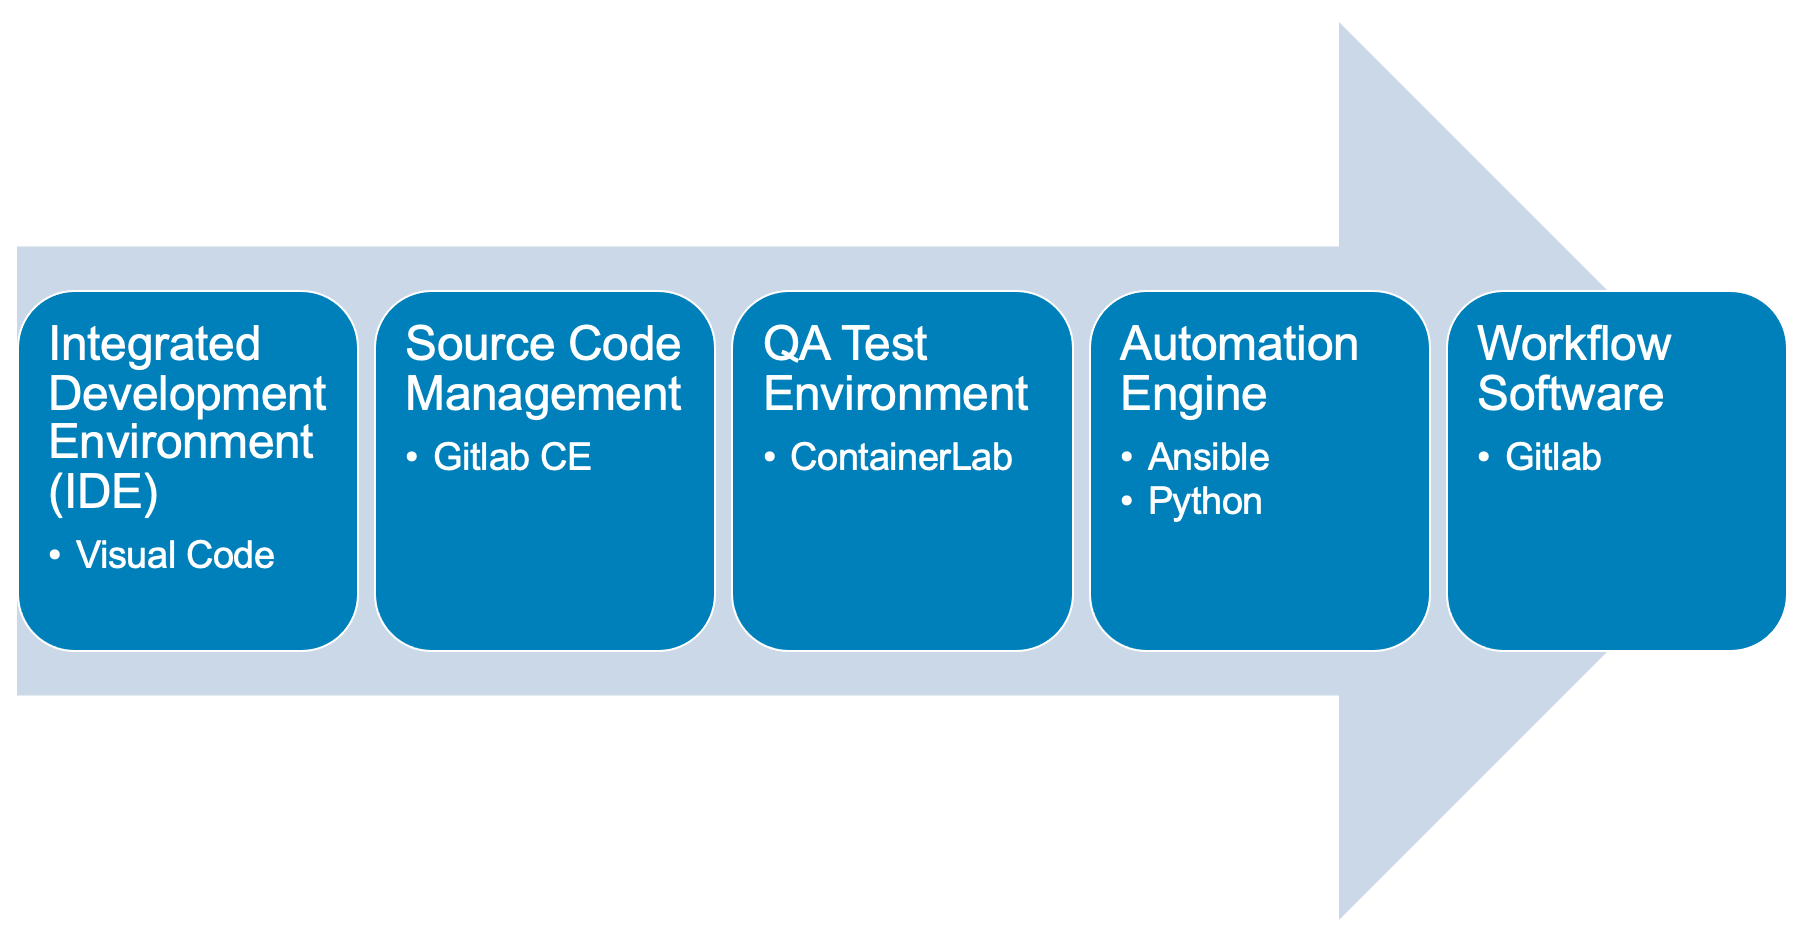
Here are the requirements for Stage 3
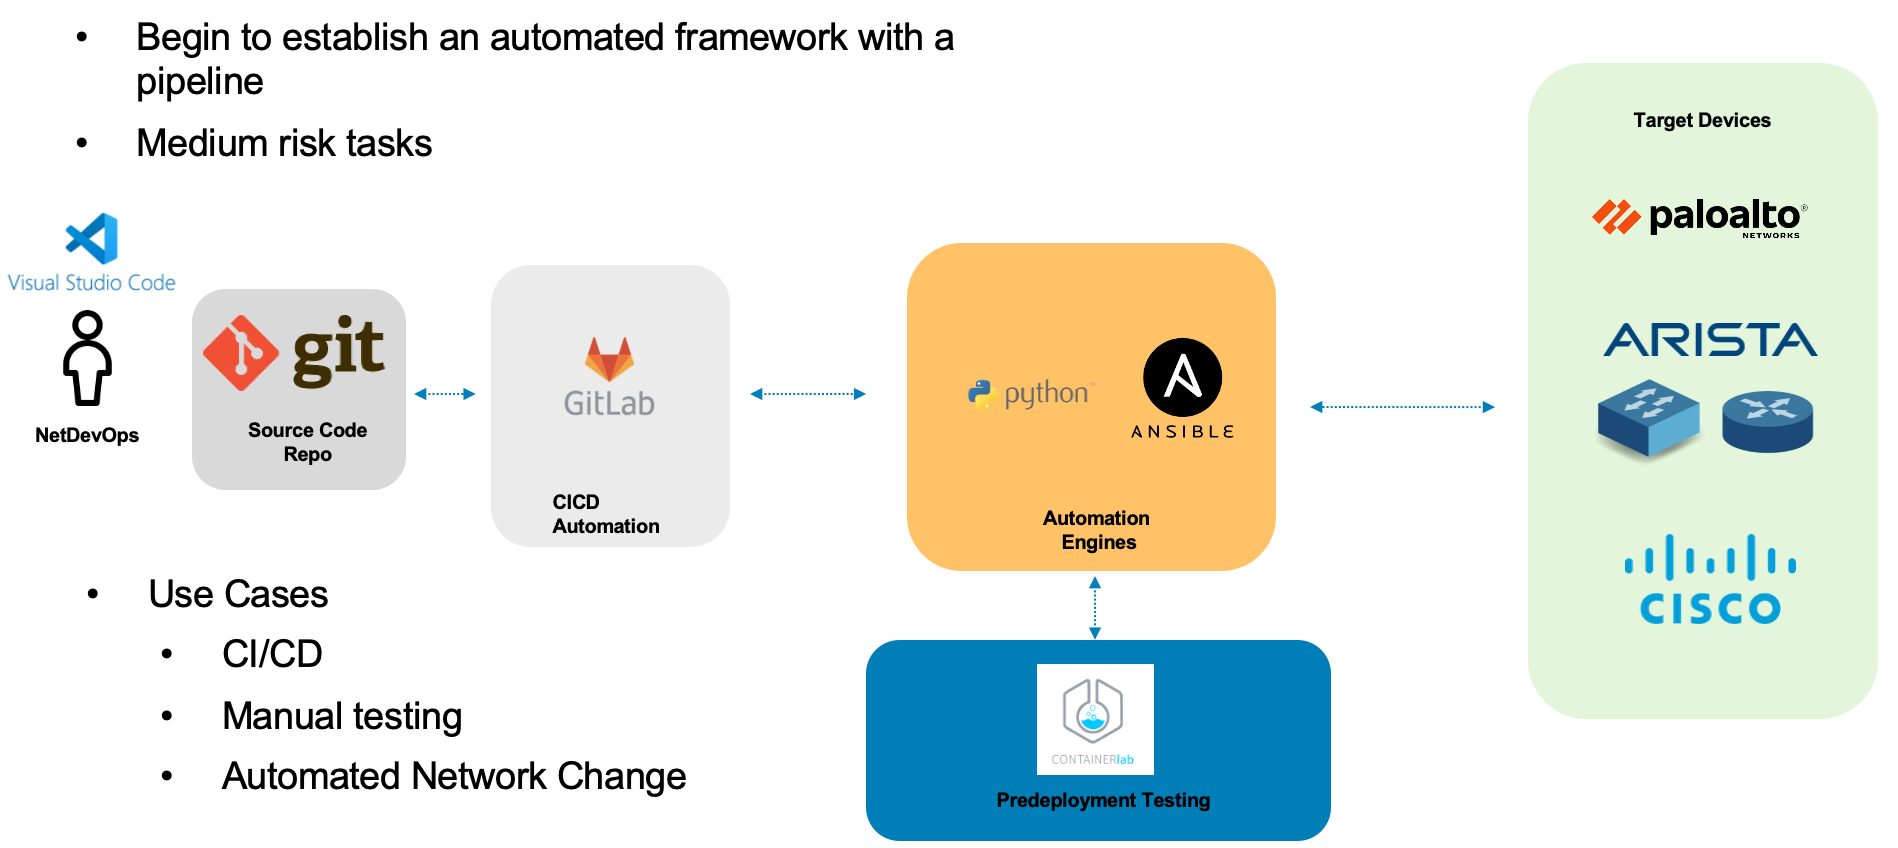
Here is a diagram of Stage 3. This shows all the technology we will be using in Stage 3.
It also defines the use cases we will be working on in Stage 3.
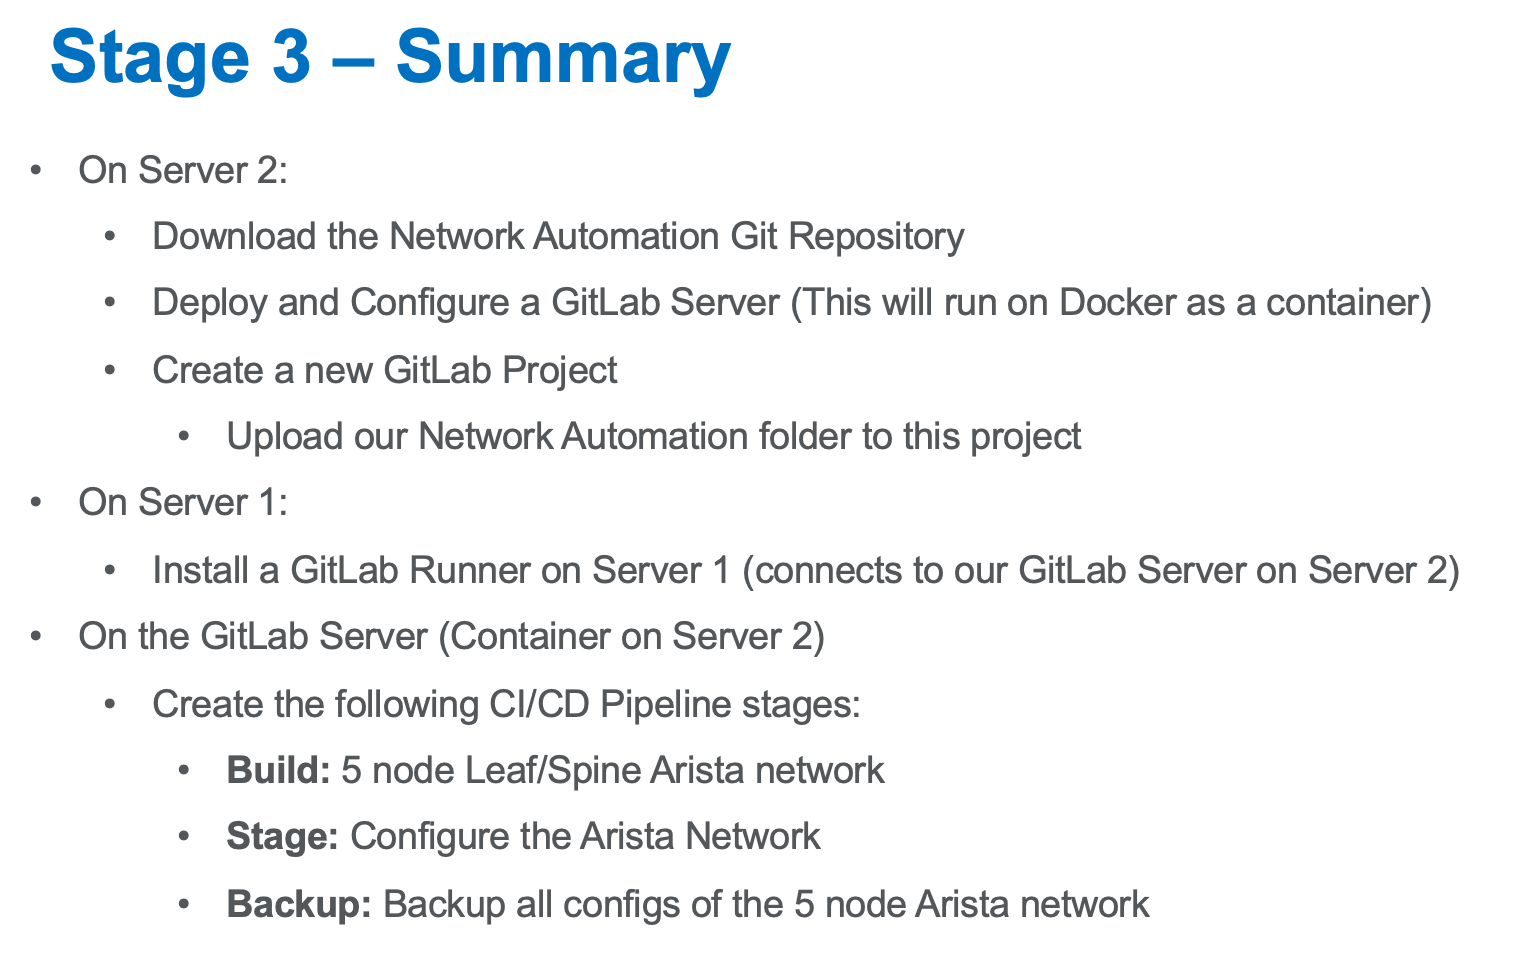
Here is a summary of Stage 3
Let’s install the GitLab Runner on Server 1
| Log back into Server 1 |
Install the GitLab Runner
sudo curl -L --output /usr/local/bin/gitlab-runner https://gitlab-runner-downloads.s3.amazonaws.com/latest/binaries/gitlab-runner-linux-amd64"curl: (23) Failed writing body (0 != 15784)" is not an error. Do not troubleshoot this.
Give Permission to Execute
sudo chmod +x /usr/local/bin/gitlab-runnerCreate a User for the Runner
sudo useradd --comment 'GitLab Runner' --create-home gitlab-runner --shell /bin/bash
sudo usermod -a -G docker gitlab-runner
Update a gitlab-runner password and remember the password
sudo passwd gitlab-runnerInstall and Run the Runner (if fails proceed to next step)
sudo gitlab-runner install --user=gitlab-runner --working-directory=/home/gitlab-runner
sudo gitlab-runner start| If above step fails perform the following commands and run the above step again |
sudo mv /etc/systemd/system/gitlab-runner.service  /etc/systemd/system/gitlab-runner.service.bak
sudo rm /etc/systemd/system/gitlab-runner.service.bak
Logout of the Gitlab-CE Web Interface as a user and login as root
As root on your GitLab server (Server-2) go to the following:
Admin Area → CI/CD → Runners → New Instance (Project) Runner
http://server2/admin/runners/new (1)| 1 | Replace Server 2 with your information |
Click Linux for a Platform and a Tag of Netdevops and check “run untagged jobs” click create runner
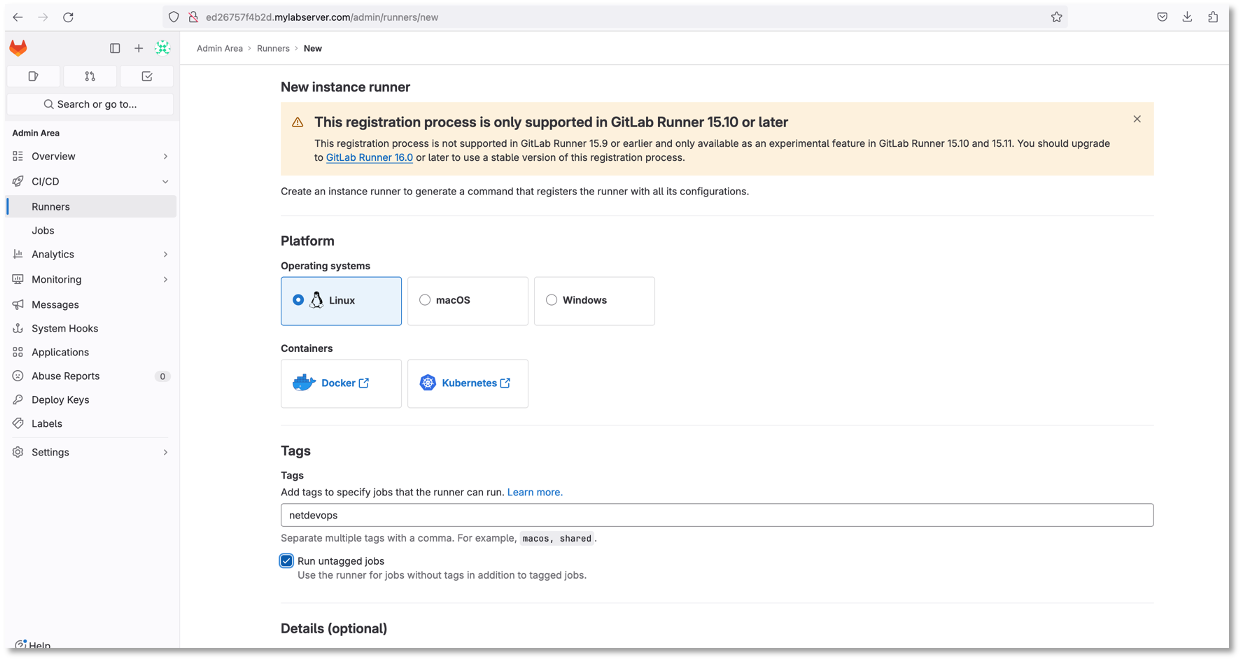
Figure 1: Setup Gitlab Runner
Copy the command from Step 1 to Server-1 and make it one line with sudo in front of it, for example.
sudo gitlab-runner register --url http://server2 --token glrt-k7HmELRbaHVxnnZa4DYf (1)| 1 | Replace Server 2 with your information along with your token |
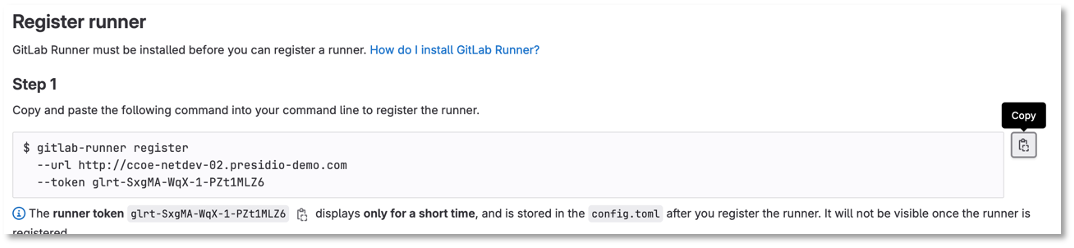
Figure 2: Gitlab Runner
cloud_user@ed26757f4b1c:~$ sudo gitlab-runner register --url http://server2 --token glrt-k7HmELRbaHVxnnZa4DYf

Please enter the gitlab-ci coordinator URL (e.g. https://gitlab.com/):
[http://server2]:
Token specified trying to verify runner...
WARNING: If you want to register use the '-r' instead of '-t'.
Verifying runner... is alive                        runner=glrt-k7H
Please enter the executor: docker, shell, ssh, virtualbox, docker-ssh+machine, kubernetes, docker-ssh, parallels, docker+machine:
shell (1)
Runner registered successfully. Feel free to start it, but if it's running already the config should be automatically reloaded!
cloud_user@ed26757f4b1c:~$ sudo gitlab-runner list
Listing configured runners                          ConfigFile=/etc/gitlab-runner/config.toml
server2                                             Executor=shell Token=glrt-k7HmELRbaHVxnnZa4DYf URL=http://server2
| 1 | Type shell for an executor |
Run this command next:
sudo gitlab-runner listEnter the following command to give the runner access to Docker:
sudo usermod -a -G docker gitlab-runnerRun the following command:
sudo visudoNow add the following to the bottom of the file and type CTRL + X, type y and then enter to save the file
gitlab-runner ALL=(ALL) NOPASSWD: ALL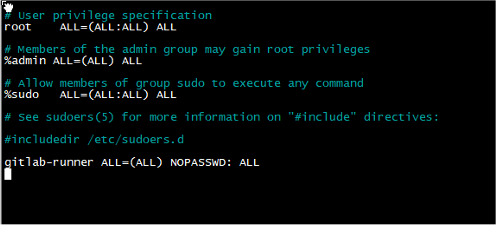
Figure 3: Gitlab Permission
| If you get an error trying to save the file,e.g., |
/etc/sudoers: near line syntax error 31 <<<
sudo: parsing error in /etc/sudoers near line 31| DO NOT SAVE THE FILE |
Lets prepare the Runner on Server 1
Modify the following file - /home/gitlab-runner/.bash_logout
sudo vi /home/gitlab-runner/.bash_logoutComment out the following by adding # before each line. Here is an example
In vi type i to insert, add the comments and then press esc and shift zz to save and exit the file
# if [ "$SHLVL" = 1 ]; then
#   [ -x /usr/bin/clear_console ] && /usr/bin/clear_console -q
# fi
Go back to the Gitlab-CE Server (Server2)
Notice the runner is created
Click Go to runners page
It should show online
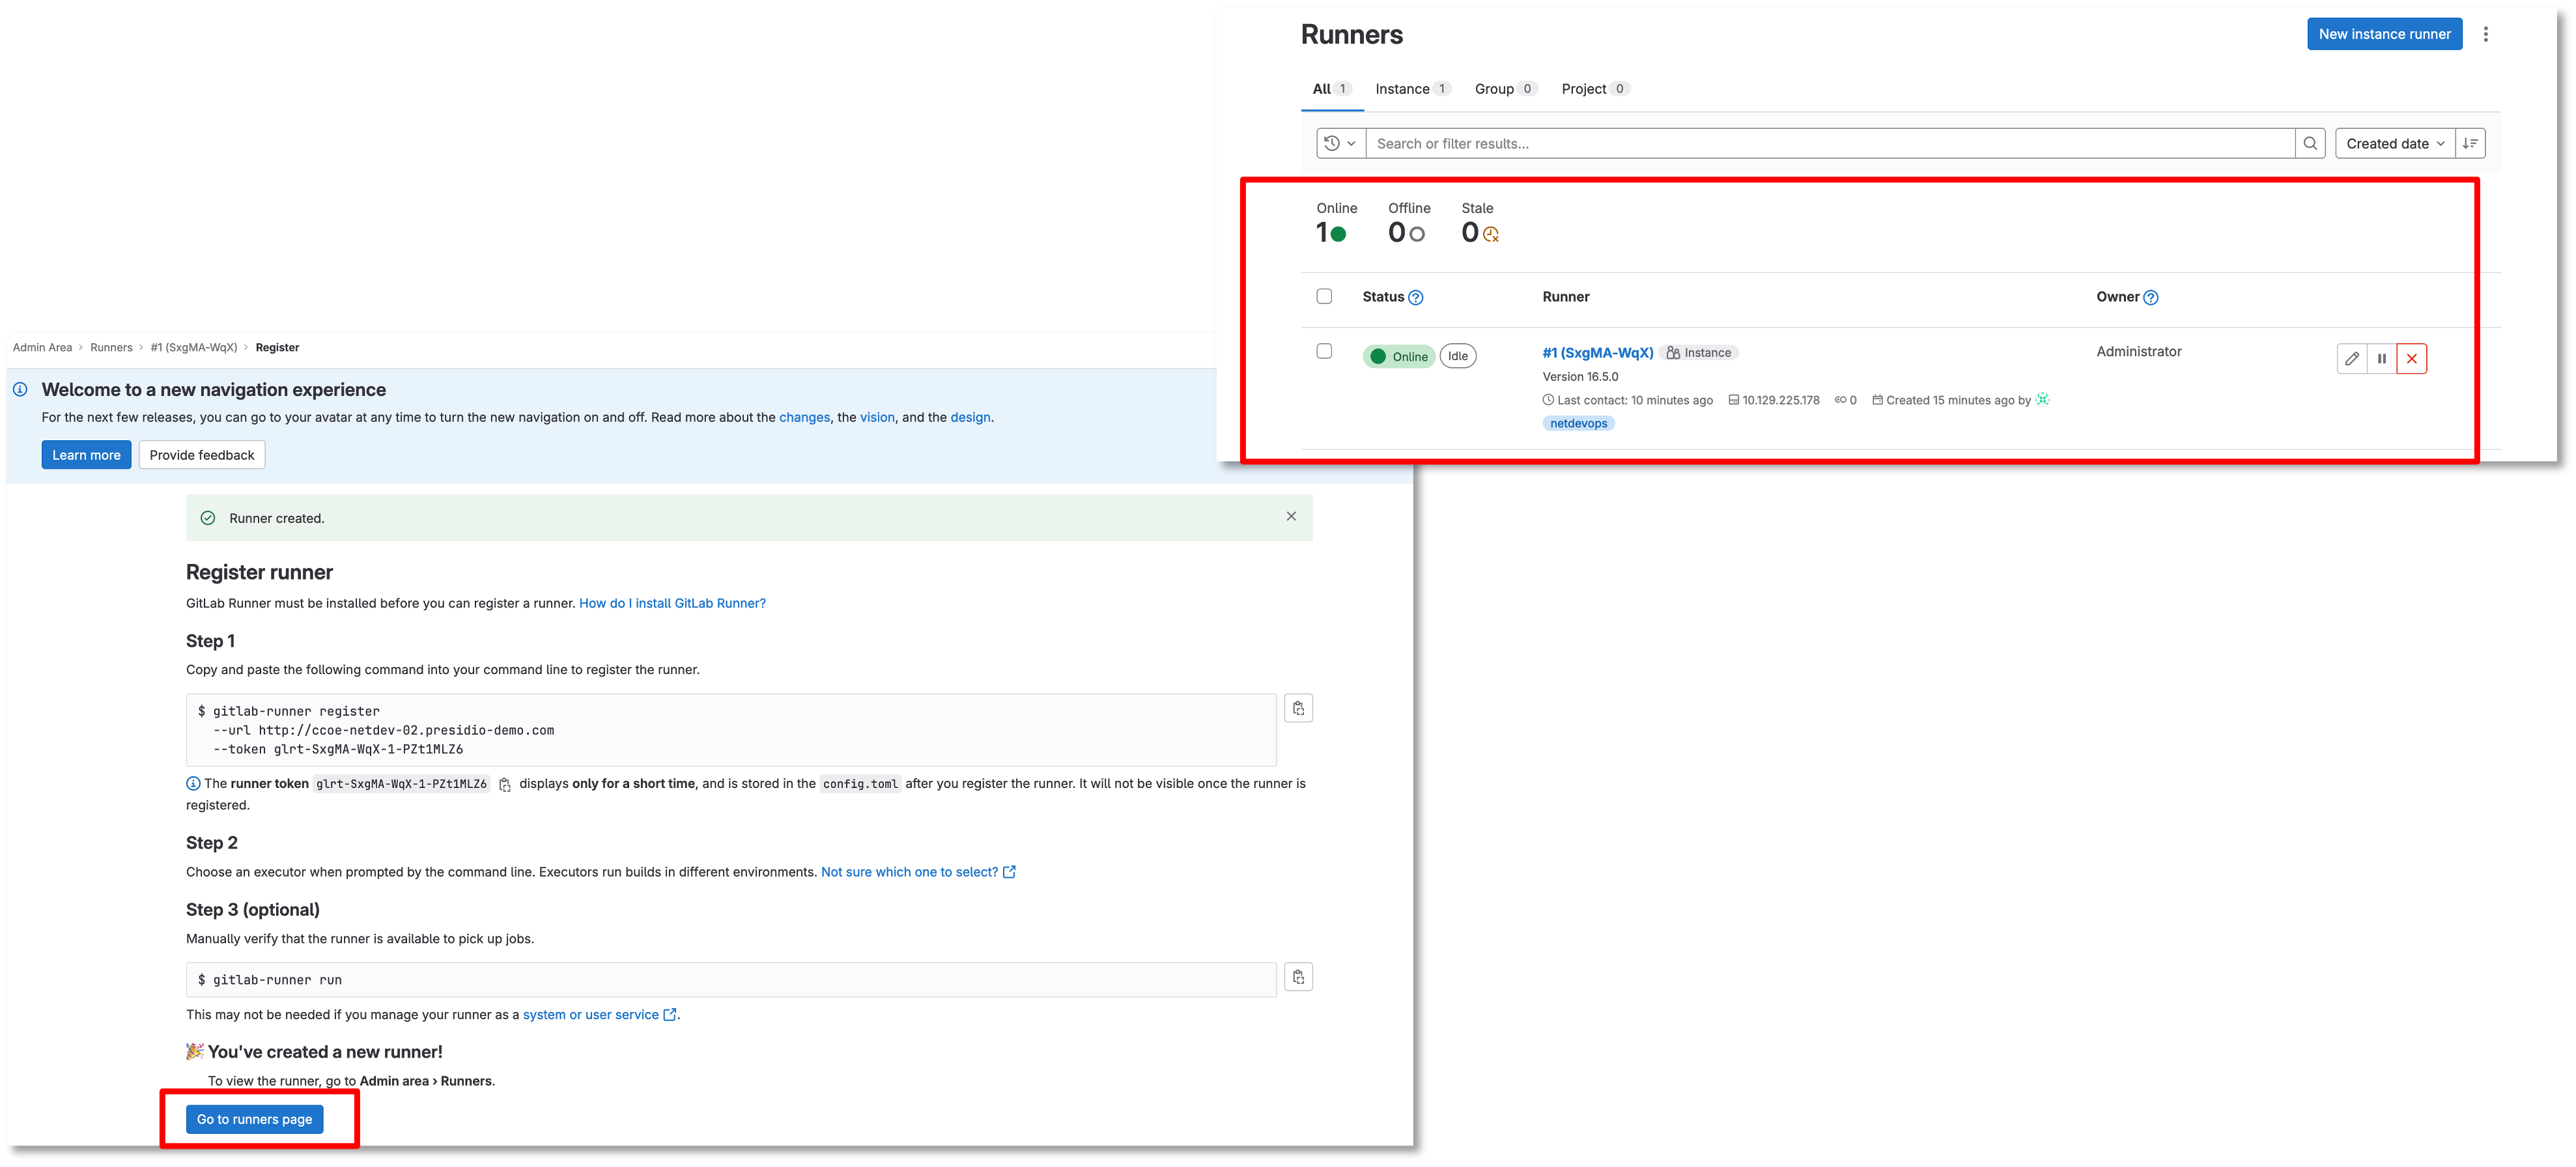
Figure 4: Gitlab Runner
Let’s Create A CI/CD Pipeline
Log out of root and login to the Gitlab-CE Web Interface as a User
Click on the Network Automation Repository
http://server2/username/network-automation (1)| 1 | Replace server FQDN and username with your information |
| Make sure you are in new navigation mode |
Go to Build → Pipeline Editor
Click Configure Pipeline
Review the example and erase the example configuration
Copy the following:
---

stages:
  - build

build_switches:
  stage: build
  before_script:
    - cd infra
  script:
    - sudo containerlab destroy -t ceos_2spine_3leaf.yaml || true
    - sudo -E CLAB_LABDIR_BASE=/var/clab containerlab deploy -t ceos_2spine_3leaf.yaml --reconfigure --max-workers 30 || true
Click the validate button before committing the changes below
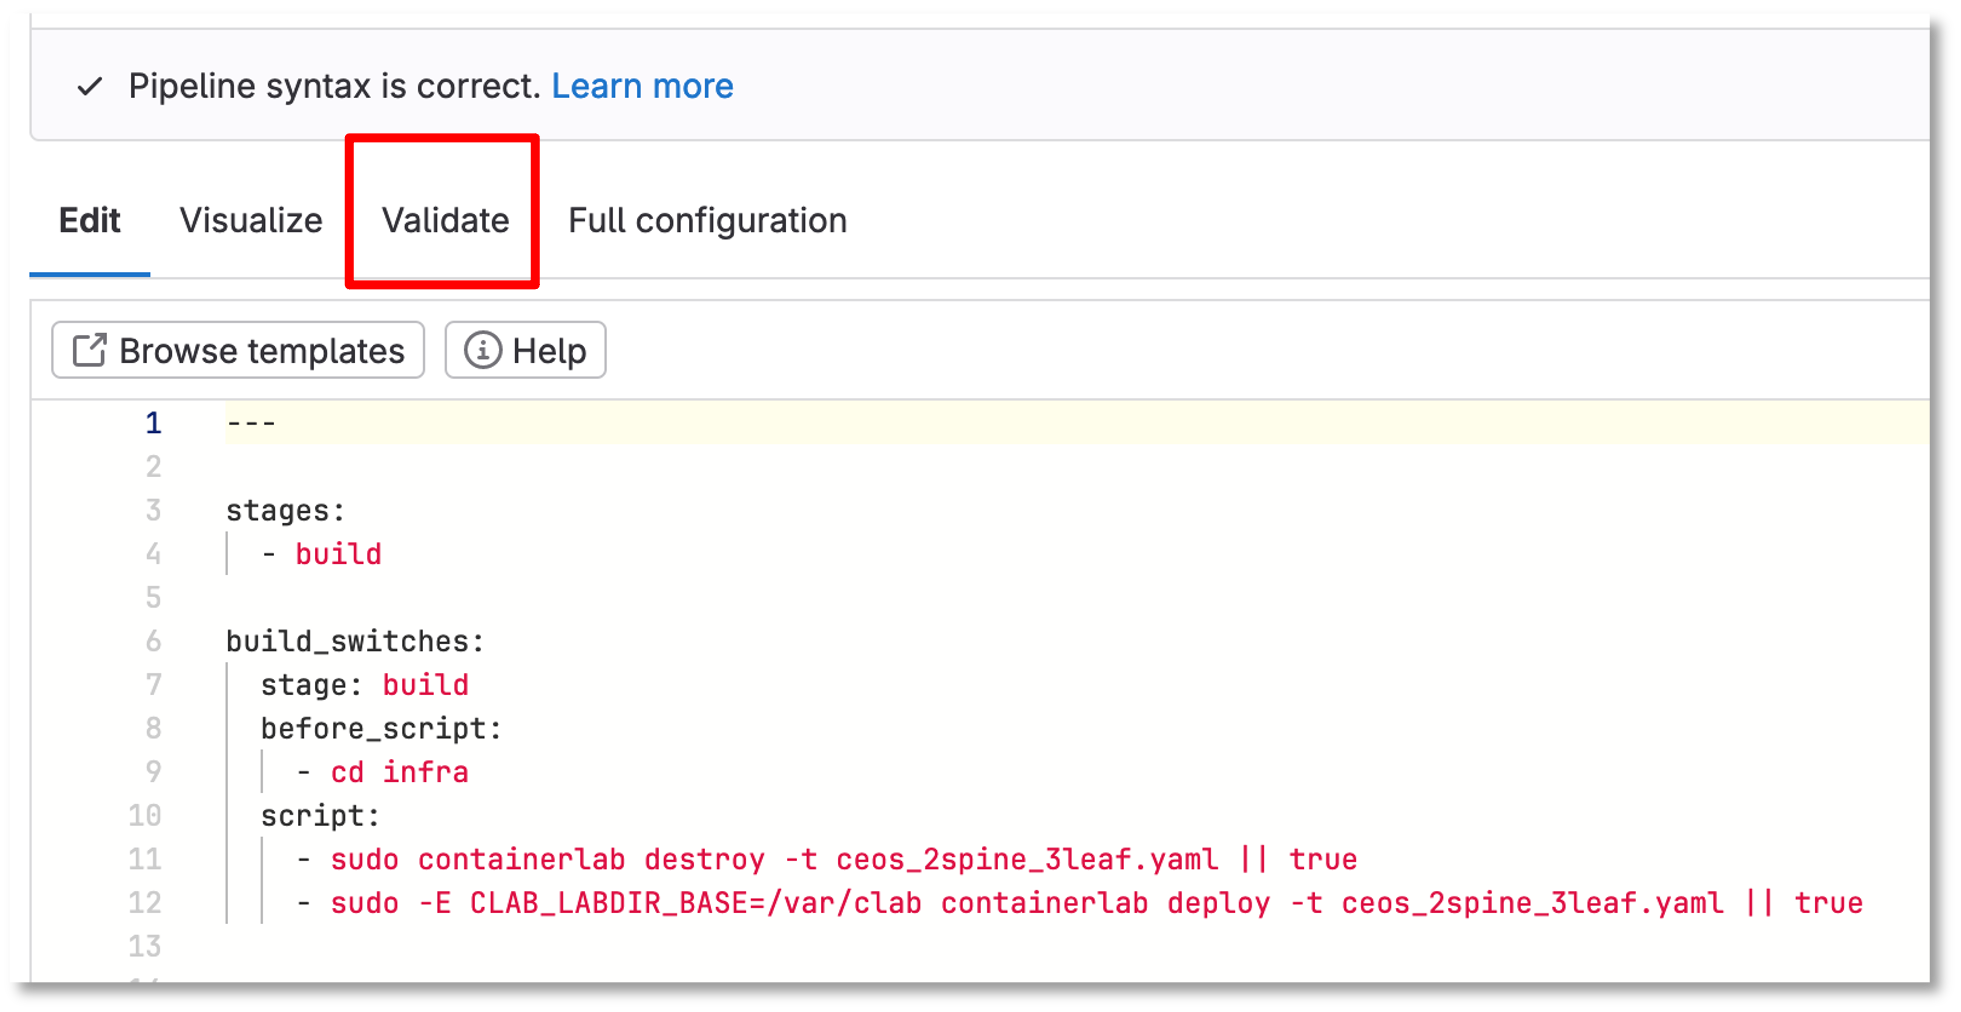
Figure 5: Gitlab Pipeline Editor
Let’s Check Your Pipeline
Go to Build → Pipelines
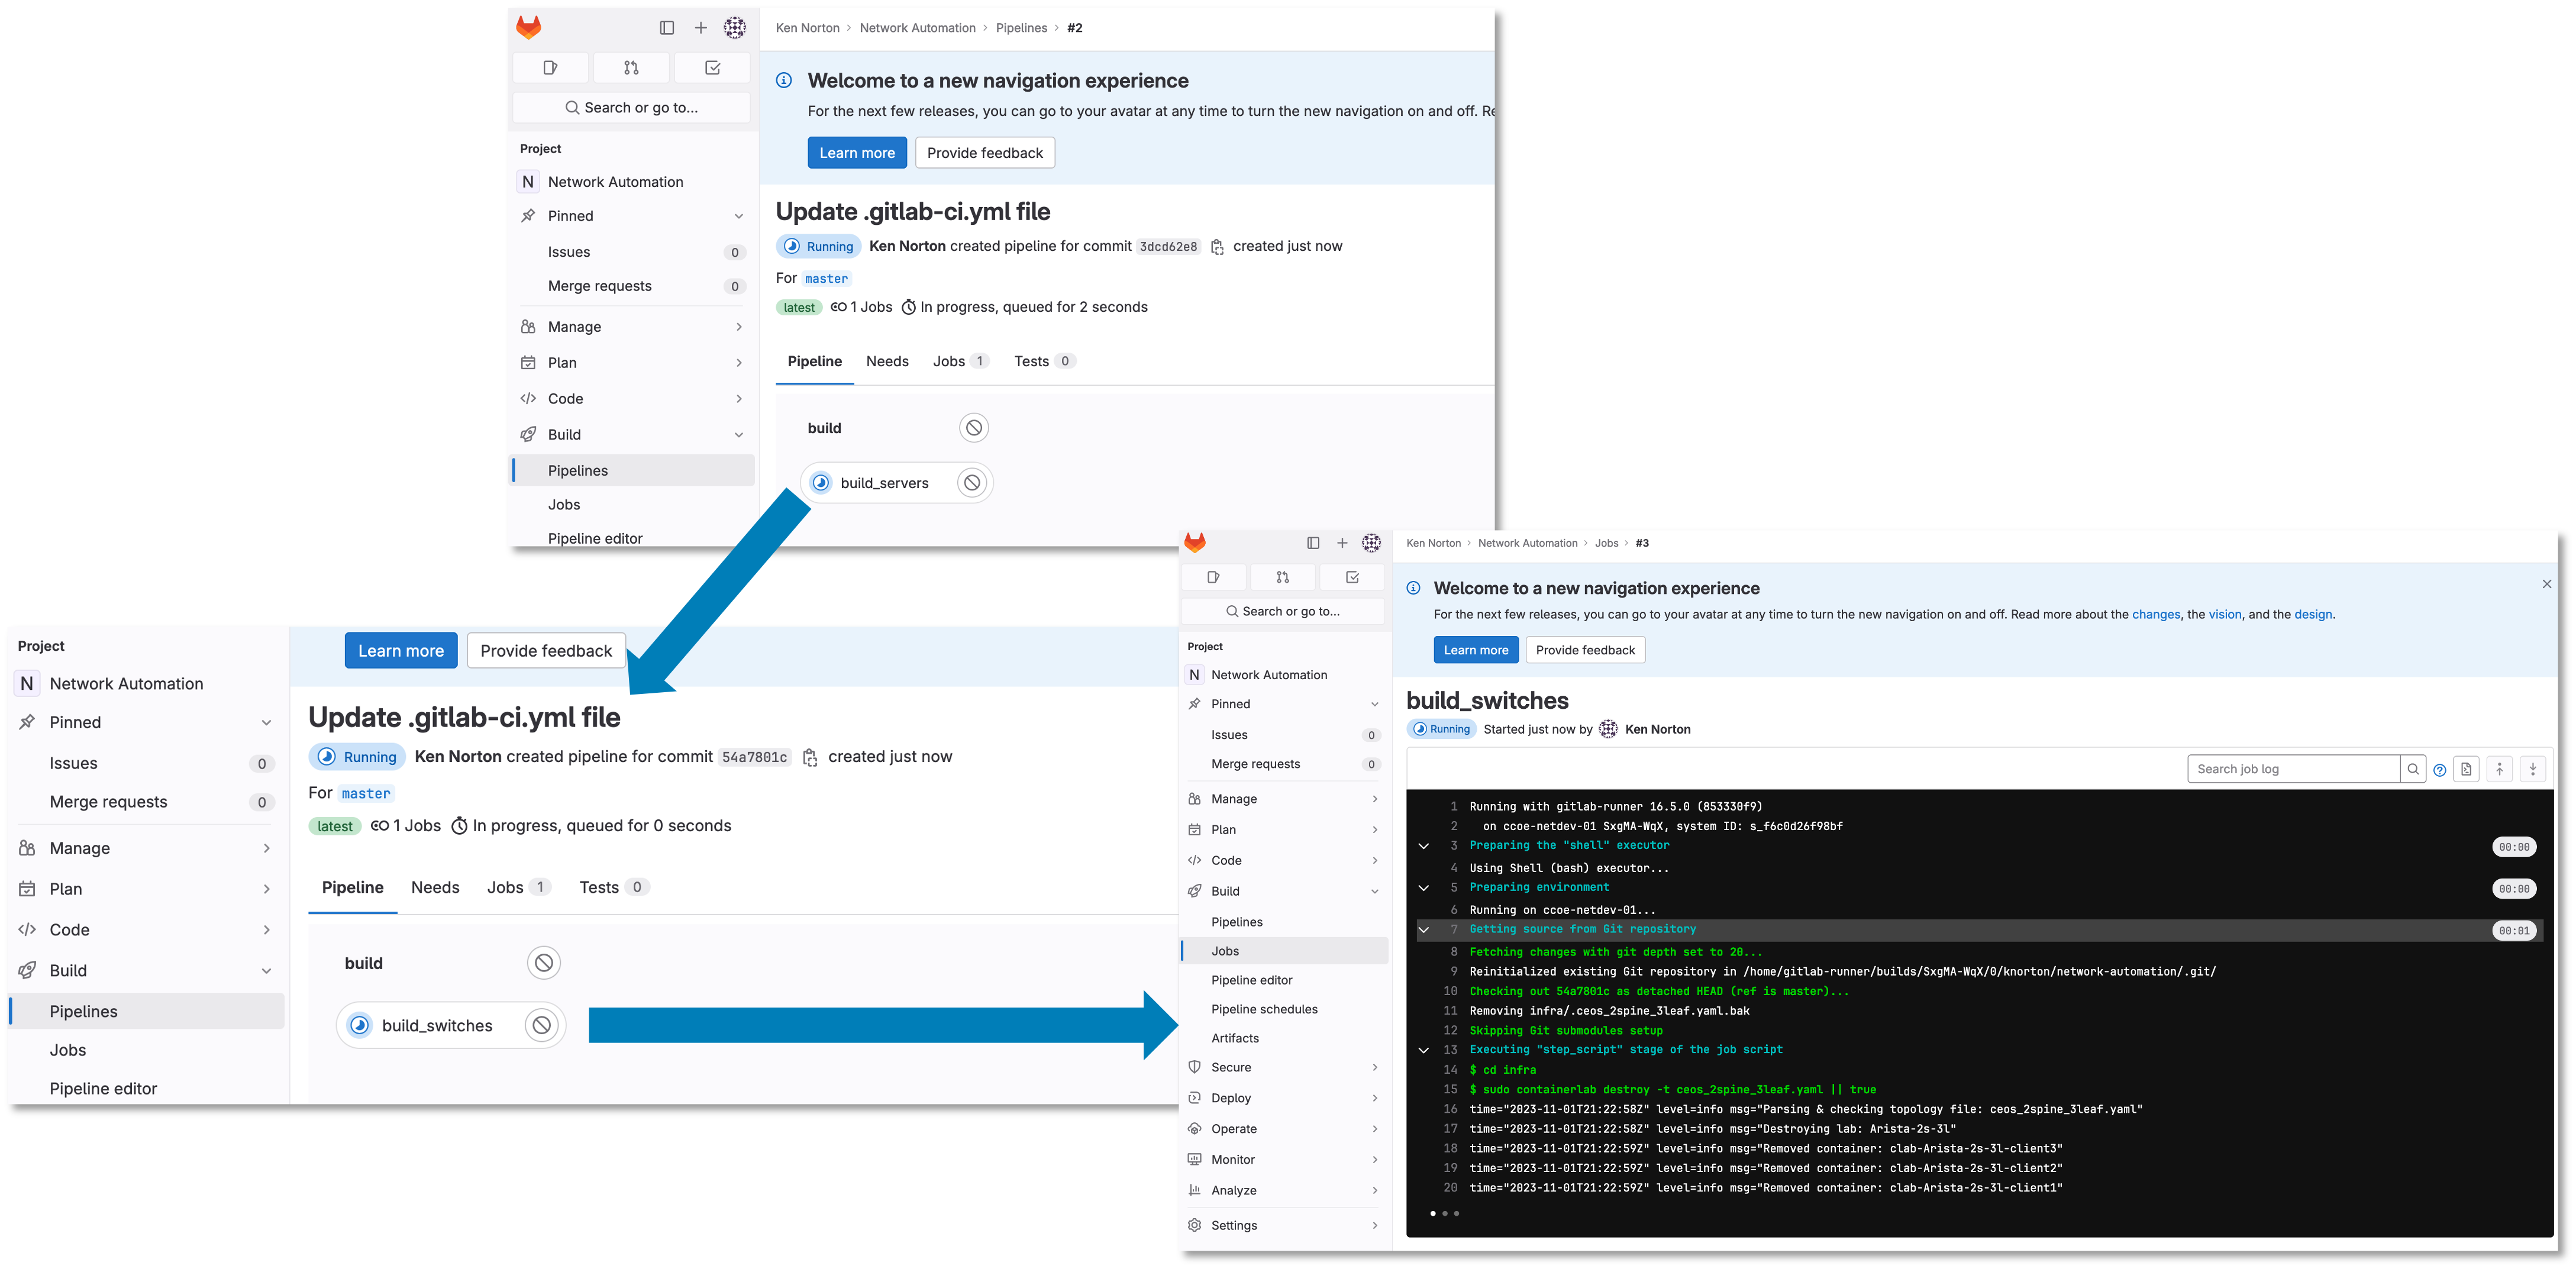
Figure 6: Gitlab Pipeline
Let’s Add More To Your Pipeline
Copy the following and click validate:
---

stages:
  - build
  - stage
  - backup

build_switches:
  stage: build
  before_script:
    - cd infra
  script:
    - sudo containerlab destroy -t ceos_2spine_3leaf.yaml || true
    - sudo -E CLAB_LABDIR_BASE=/var/clab containerlab deploy -t ceos_2spine_3leaf.yaml --reconfigure --max-workers 30 || true

staging_switches:
  stage: stage
  before_script:
    - cd build
  script:
    - sleep 60
    - ansible-playbook build.yaml -v

backup_switches:
  stage: backup
  before_script:
    - cd backup
  script:
    - ansible-playbook playbooks/manual_backup.yaml -v
  dependencies:
    - staging_switches
Then commit changes if it validates
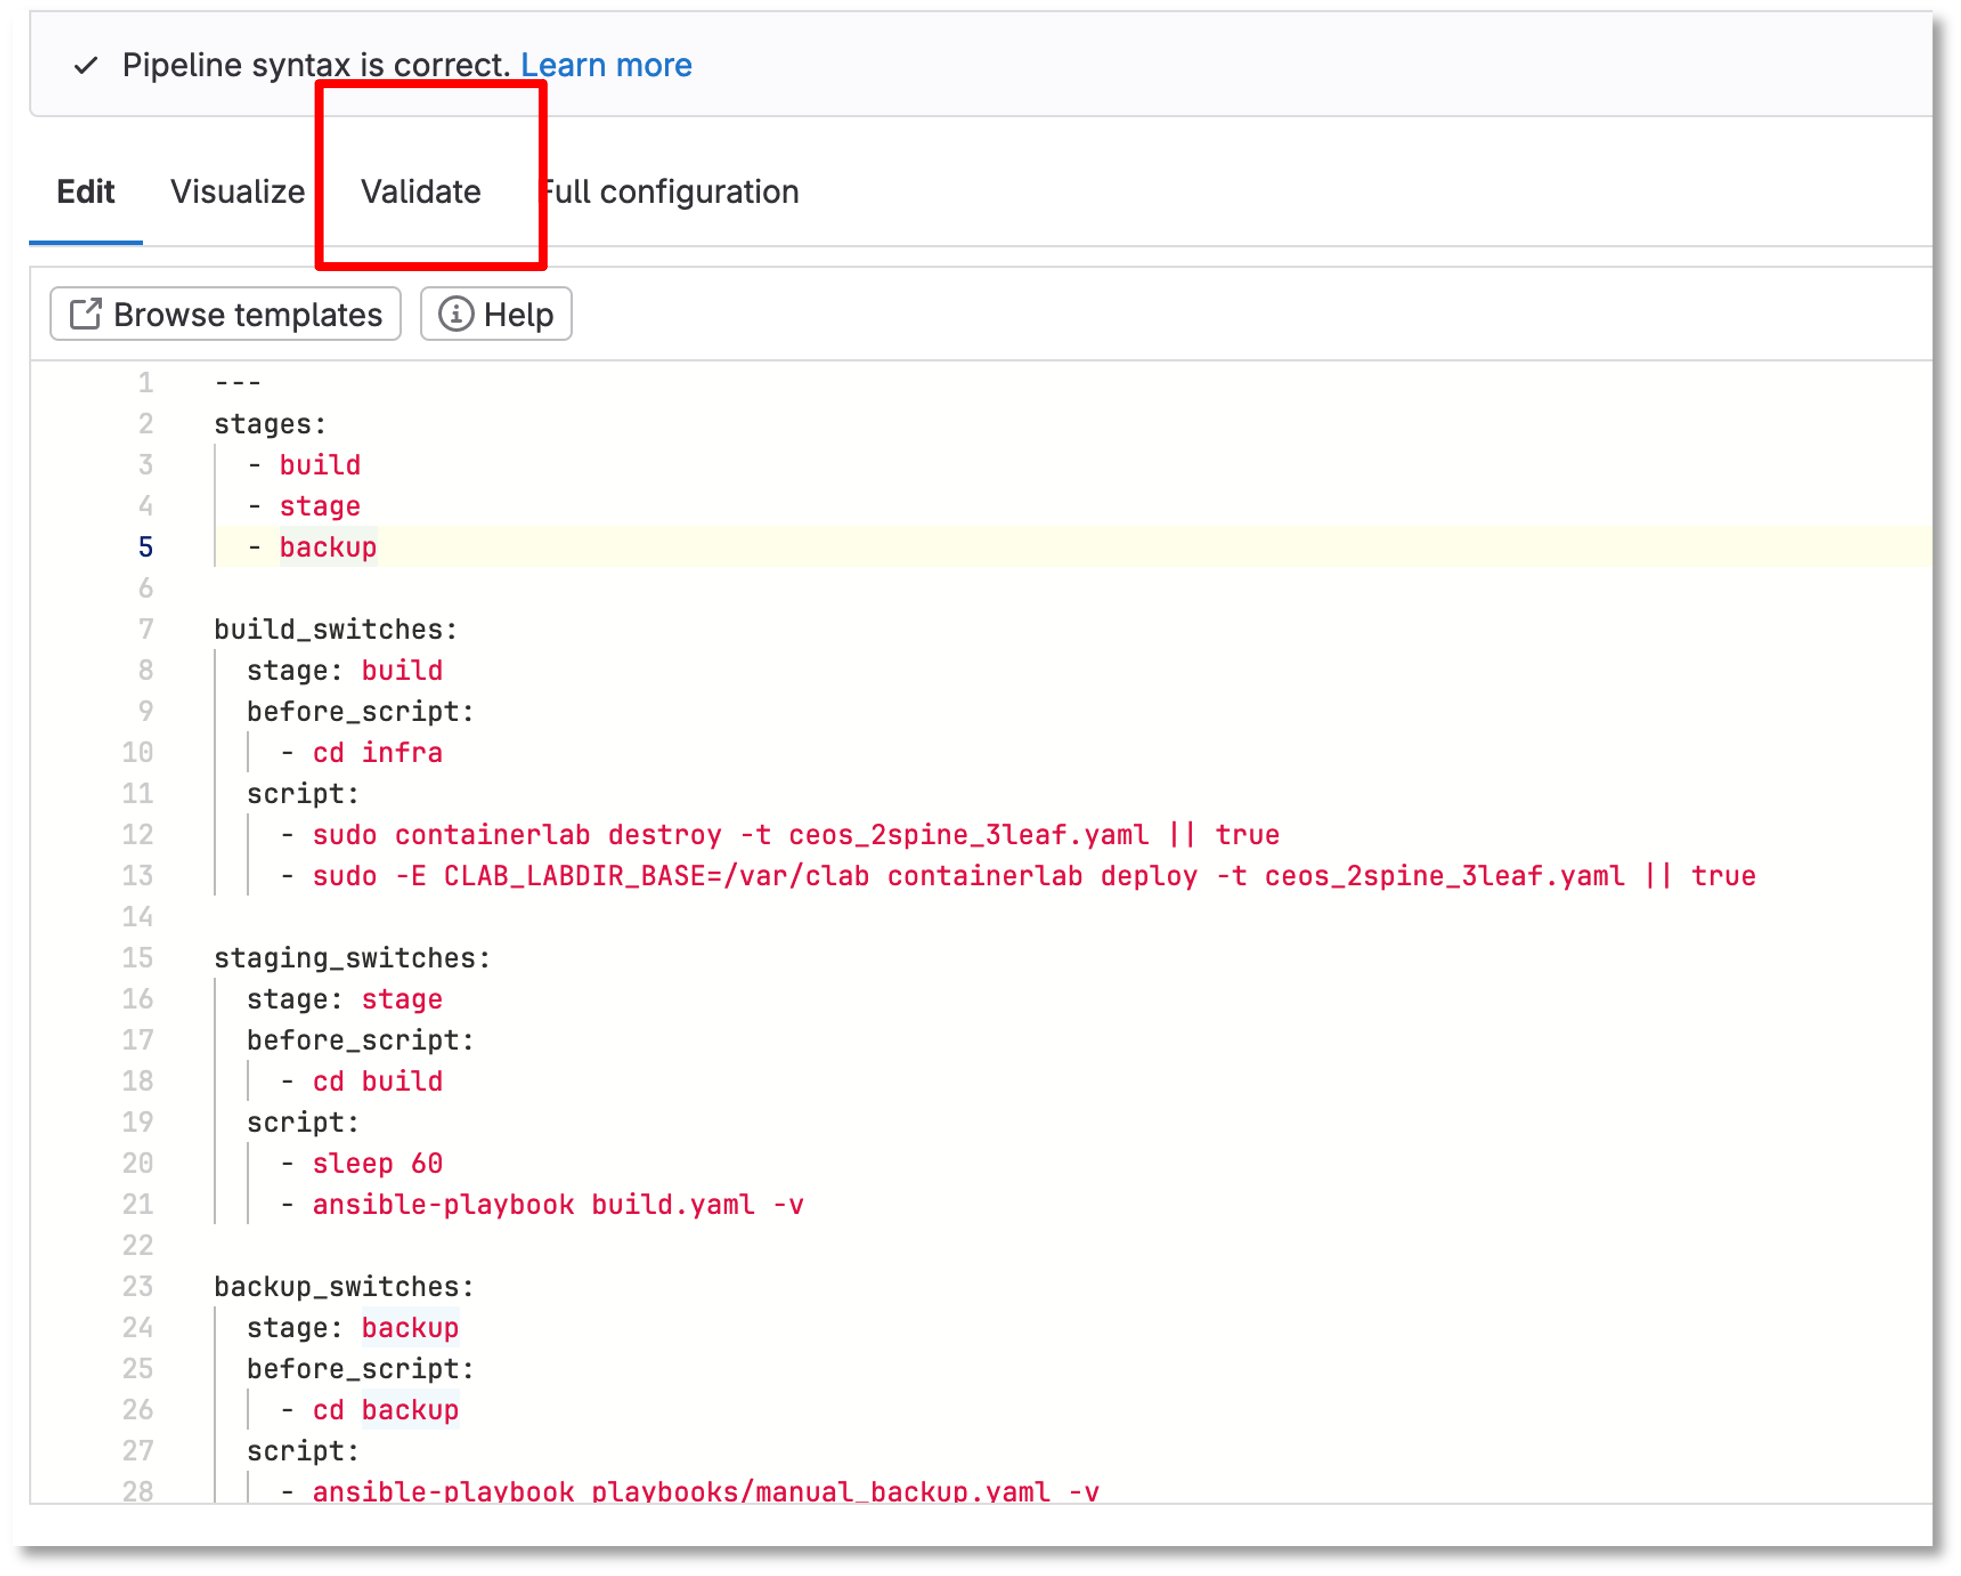
Figure 7: Updated The Pipeline
Checkout The Pipeline
Notice the new stages in the Pipeline, but the pipeline stops due to an error
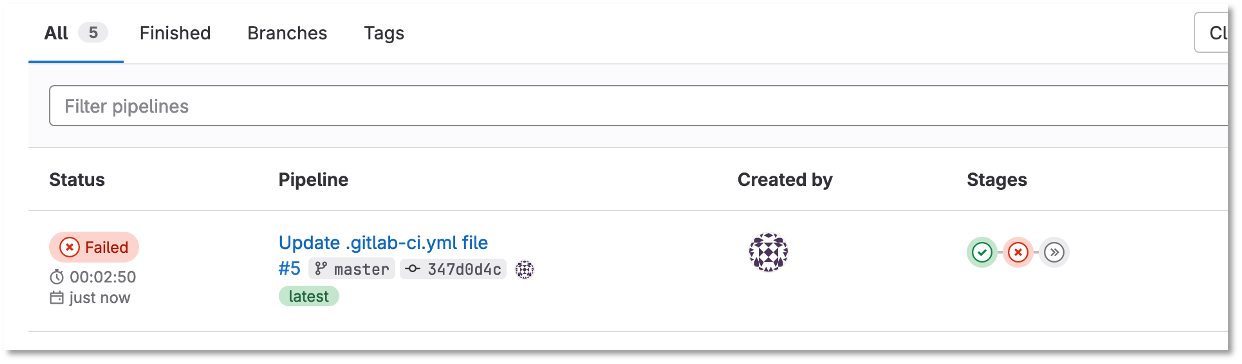
Figure 8: Failed Pipeline
Click on the failed pipeline and click the staging switches to see the details
Update The Pipeline*
Click on Build → Pipeline Editor
Copy the following to include the following to the staging_switches section:
pip install ansible-pylibssh
ansible-galaxy collection install arista.eos
---

stages:
  - build
  - stage
  - backup

build_switches:
  stage: build
  before_script:
    - cd infra
  script:
    - sudo containerlab destroy -t ceos_2spine_3leaf.yaml || true
    - sudo -E CLAB_LABDIR_BASE=/var/clab containerlab deploy -t ceos_2spine_3leaf.yaml --reconfigure --max-workers 30 || true

staging_switches:
  stage: stage
  before_script:
    - cd build
  script:
    - sleep 60
    - pip install ansible-pylibssh
    - ansible-galaxy collection install arista.eos
    - ansible-playbook build.yaml -v

backup_switches:
  stage: backup
  before_script:
    - cd backup
  script:
    - ansible-playbook playbooks/manual_backup.yaml -v
  dependencies:
    - staging_switches
Success
Now you have automated the following in a CI/CD pipeline:
-
The creation of 5 switches and 3 Linux clients
-
The configuration of 5 switches with VXLAN and routing with complete IP reachability
-
The backup of the 5 switch configurations to a folder on Server 1
Let’s Create A Backup Repository - Optional
Lets automate the backup of the configs and upload the configurations to Gitlab
Create a new repository on the Gitlab-CE Server called Backup
Go back to projects and click New project
Click Create blank project
Name the project Backup a
CLick internal
Uncheck Initialize repository with a README
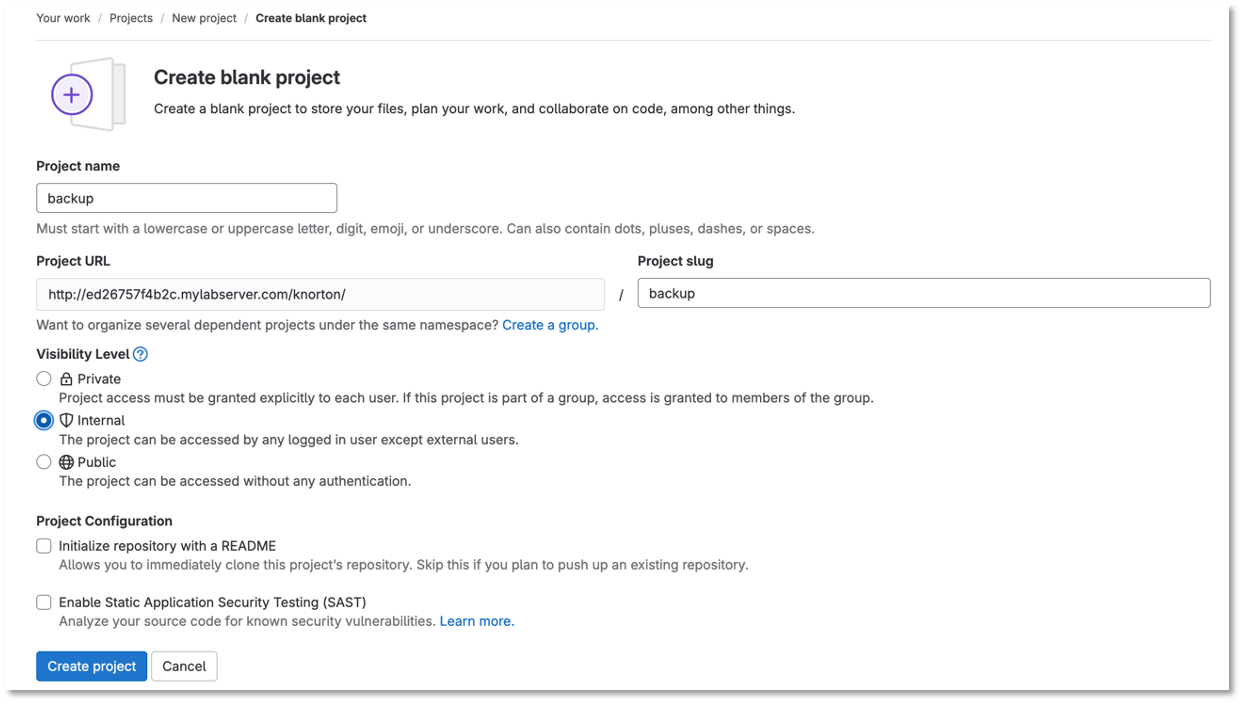
Figure 9: Backup Repository
| Uncheck "initialize repository with a README" |
Jump on the Server running the Gitlab-Runner - Server 1
Lets create an SSH key pair to automatically push the configuration through the CI/CD pipeline without prompting for a username and password
Login as the gitlab-runner and follow the steps below to create an ssh key
su gitlab-runnercd ~
ssh-keygencloud_user@ed26757f4b1c:~$ su gitlab-runner Password: gitlab-runner@ed26757f4b1c:/home/cloud_user$ cd ~ gitlab-runner@ed26757f4b1c:~$ ssh-keygen Generating public/private rsa key pair. Enter file in which to save the key (/home/gitlab-runner/.ssh/id_rsa): Enter passphrase (empty for no passphrase): Enter same passphrase again: Your identification has been saved in /home/gitlab-runner/.ssh/id_rsa.pub Your public key has been saved in /home/gitlab-runner/.ssh/id_rsa.pub The key fingerprint is: SHA256:AO6s6kw4FID/JhCa3I+KwmGze0tZpc7Mx3XL3sa8EmE gitlab-runner@ed26757f4b1c.mylabserver.com The key's randomart image is: +---[RSA 3072]----+ |o . | |+ . . | |o=. . .. | |+.o+ o. E | | o .=o S.... | |o+.oX.. . o.. | |*.*= = o o+ | |=*.. . ...+ | |++o.. .oo. | +----[SHA256]-----+
Run this command
cat /home/gitlab-runner/.ssh/id_rsa.pubCopy the contents of your public key to the clipboard
Go to the Gitlab server
Edit your profile under your user settings to add the public key
Select SSH Keys and add new key
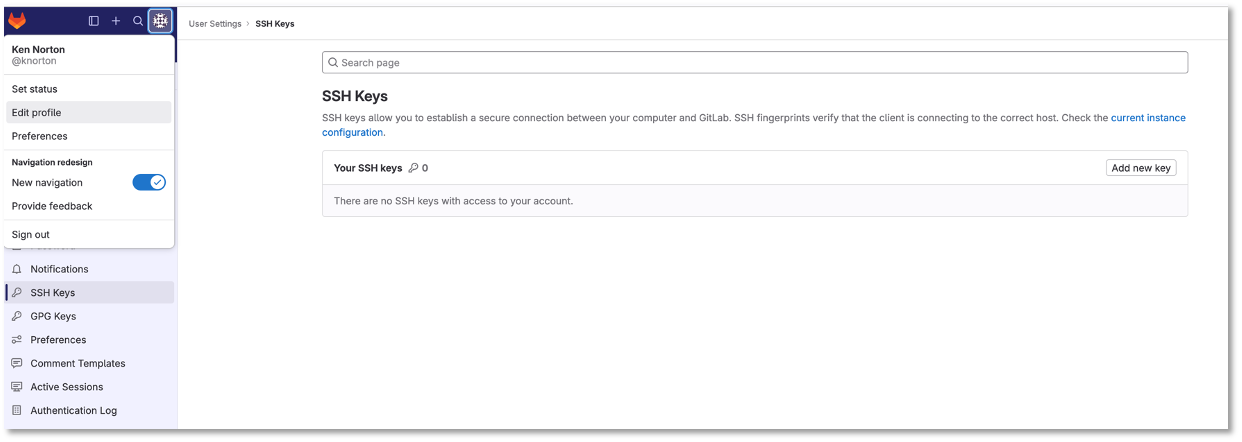
Figure 10: SSH Key
Paste the key in the key text box and click add key
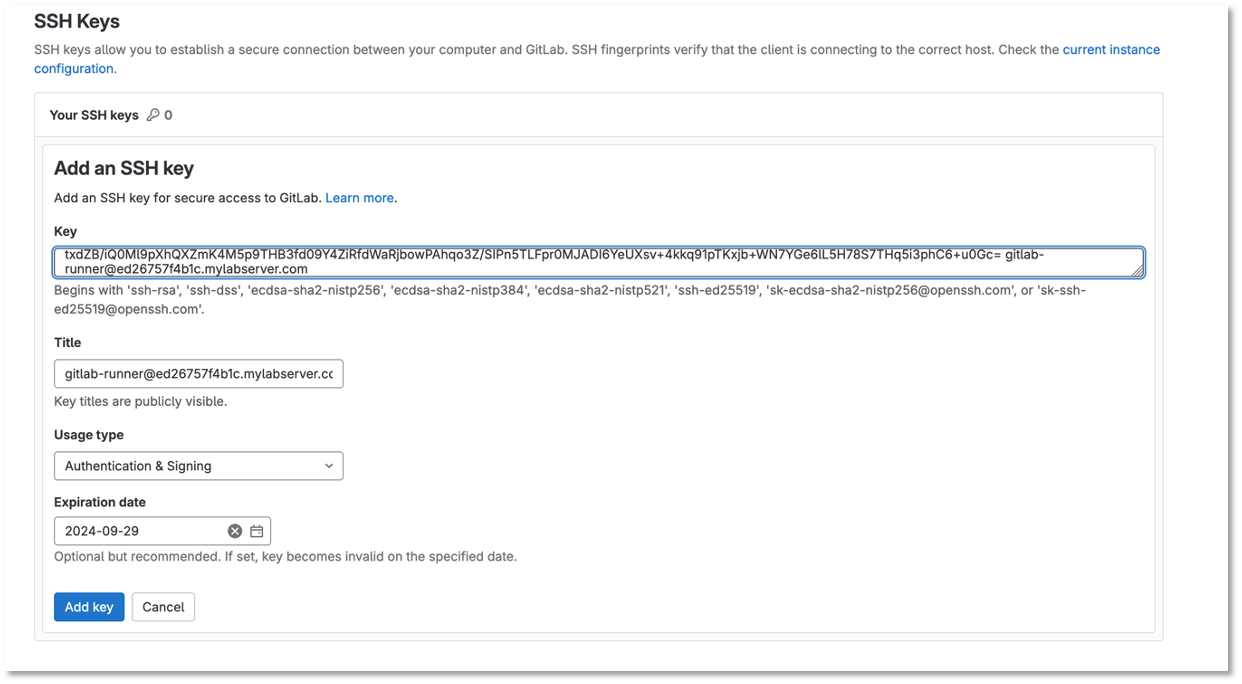
Figure 11: Paste SSH Key
On Server1 cd to the .ssh directory for the gitlab-runner user
cd ~/.sshCreate and save a new file named “config” in the .ssh folder
vi configType i and copy and paste the following:
Host server2 (1)
   Hostname server2 (1)
   User git
   Port 2222
   Preferredauthentications publickey
   IdentityFile ~/.ssh/id_rsa
Type esc and then shift + zz to save and exit the file
| Port 2222 for external connectivity translates to 22 for internal in Docker. |
| 1 | Change the host and hostname values to reflect your Gitlab-CE Server. Use the FQDN. |
Restart sshd
sudo systemctl restart sshdRun the following command to test connectivity
ssh -T git@server2 (1)| 1 | Change the hostname values to reflect your Gitlab-CE Server. Use the FQDN. |
cloud_user@ed26757f4b1c:~$ ssh -T git@ccoe-netdev-02.presidio-demo.com
The authenticity of host '[ccoe-netdev-02.presidio-demo.com]:2222 ([10.129.225.179]:2222)' can't be established.
ECDSA key fingerprint is SHA256:JhIlzg5flNje7/tMtzv6e8S/axpapbp38sh61unVBQs.
Are you sure you want to continue connecting (yes/no/[fingerprint])? yes
Warning: Permanently added '[ccoe-netdev-02.presidio-demo.com]:2222,[10.129.225.179]:2222' (ECDSA) to the list of known hosts.
Welcome to GitLab, @knorton!
| If you are recieving an ssh timeout, make sure port 2222 is open to Server2. If you are using a cloud platform you may need to add the Server2 internal IP address to the Server1 host file. |
Jump back on the Server 1 running the Gitlab-Runner
Login to your new backup repository
Let’s backup the config and upload the configurations to Gitlab
Run the following commands while logged in as the gitlab-runner:
cd ~
cd network-automation/backup/
git init
On the Gitlab-Ce server capture the git remote add origin command from your backup git repository on the GitLab Server
git remote add origin git@server2:knorton/backup.git (1)| 1 | Grab the git remote add origin command from your backup git repository on the GitLab Server |
git add .git config --global user.email "knorton@presidio.com" (1)
git config --global user.name "Ken Norton" (2)| 1 | Change the user email with your email address |
| 2 | Change the user name with your name |
git commit -m "Initial commit of backup"git push --set-upstream origin masterFollow the git commands in the image below
cloud_user@ed26757f4b1c:~$ su gitlab-runner
Password:
gitlab-runner@ed26757f4b1c:/home/cloud_user$ cd ~
gitlab-runner@ed26757f4b1c:/home$ cd network-automation/backup/
gitlab-runner@ed26757f4b1c:~/network-automation/backup$ git init
Initialized empty Git repository in /home/gitlab-runner/network-automation/backup/.git/
gitlab-runner@ed26757f4b1c:~/network-automation/backup$ git remote add origin git@server2:knorton/backup.git (1)
gitlab-runner@ed26757f4b1c:~/network-automation/backup$ git add .
gitlab-runner@ed26757f4b1c:~/network-automation/backup$ git config --global user.email "knorton@presidio.com"
gitlab-runner@ed26757f4b1c:~/network-automation/backup$ git config --global user.name "Ken Norton"
gitlab-runner@ed26757f4b1c:~/network-automation/backup$ git commit -m "Initial commit of backup"
[master (root-commit) cf49541] Initial commit of backup
 5 files changed, 324 insertions(+)
 create mode 100644 2023-12-17/show_run_clab-Arista-2s-3l-leaf1.txt
 create mode 100644 2023-12-17/show_run_clab-Arista-2s-3l-leaf2.txt
 create mode 100644 2023-12-17/show_run_clab-Arista-2s-3l-leaf3.txt
 create mode 100644 2023-12-17/show_run_clab-Arista-2s-3l-spine1.txt
 create mode 100644 2023-12-17/show_run_clab-Arista-2s-3l-spine2.txt
gitlab-runner@ed26757f4b1c:~/network-automation/backup$ git push --set-upstream origin master
Enumerating objects: 8, done.
Counting objects: 100% (8/8), done.
Delta compression using up to 2 threads
Compressing objects: 100% (7/7), done.
Writing objects: 100% (8/8), 2.12 KiB | 1.06 MiB/s, done.
Total 8 (delta 4), reused 0 (delta 0)
To ed26757f4b2c.mylabserver.com:knorton/backup.git
 * [new branch]      master -> master
Branch 'master' set up to track remote branch 'master' from 'origin'.
| 1 | Grab the git remote add origin command from your backup git repository on the GitLab Server |
Go back to the Network Automation repository
Let’s modify the backup stage in CI/CD Pipeline to reflect the highlighted area in the diagram and click commit changes
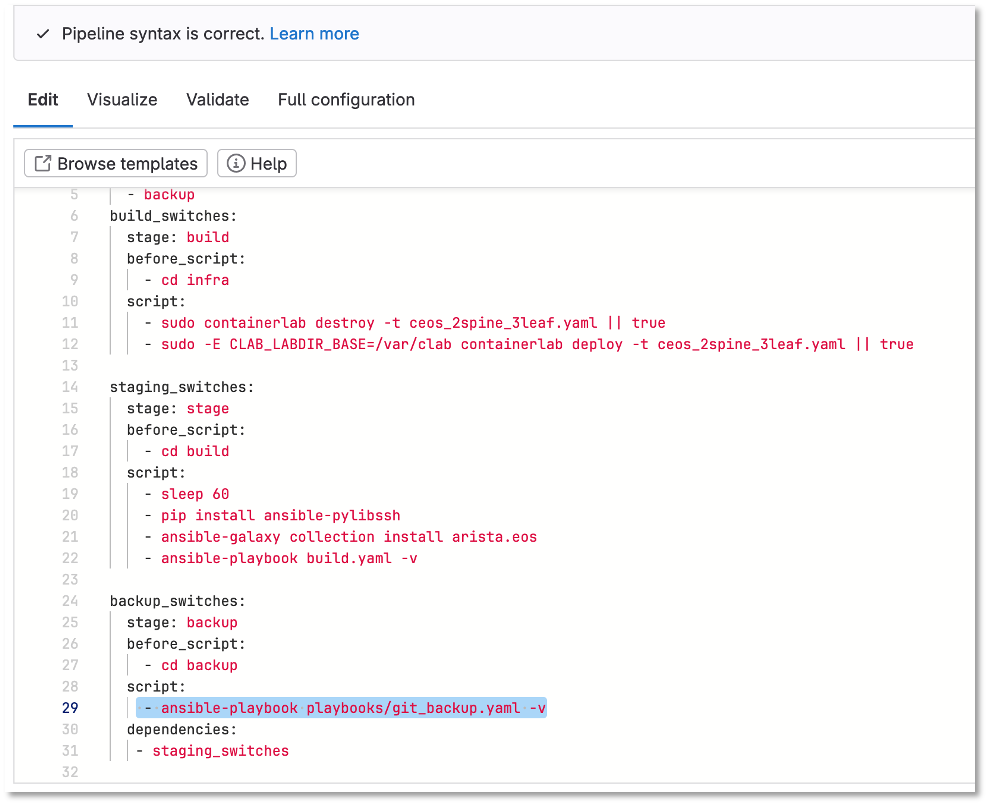
Figure 12: Update PipeLine To Reflect Git Backup
Go back to the Backup repository
Check out the switch configurations
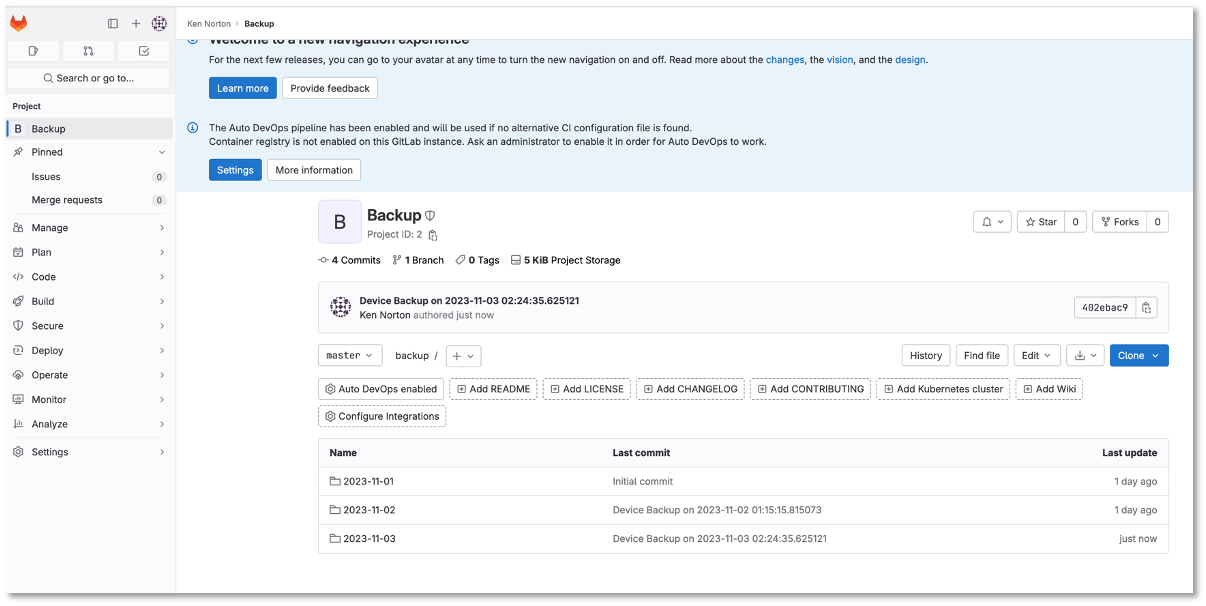
Figure 13: Switch Configuration In Git Backup